A First Look at tRPC
Published:
tRPC is a TypeScript library for building end-to-end, type-safe APIs. It creates fully typed endpoints on the backend which are queried from a frontend client.
Outline
All of this project’s code can be found in the First Look monorepo on my GitHub.
Introduction
tRPC is a TypeScript library for building end-to-end, type-safe APIs. It creates fully typed endpoints on the backend which can be queried from a frontend written in TypeScript. While it is typically integrated with React or Next, it can be used with Vue, Svelte, or plain TypeScript.
The project began in July 2020 as a proof of concept from Colin McDonnell, the creator of Zod. Originally called ZodRPC, Colin described it as “a toolkit for creating type-safe backends powered by Zod.” What is Zod, you say? Glad you asked!
![]()
Schema Validation with Zod
Zod is a TypeScript-first schema declaration and validation library that uses a “schema” to broadly refer to any data type which can be declared with static types in TypeScript. Here is how Colin described Zod when the project was first released:
Zod is a validation library designed for optimal developer experience. It’s a TypeScript-first schema declaration library with rigorous (and correct!) inferred types, incredible developer experience, and a few killer features missing from the existing libraries.
- Uses TypeScript generic inference to statically infer the types of your schemas.
- Eliminates the need to keep static types and runtime validators in sync by hand.
- Has a composable, declarative API that makes it easy to define complex types concisely.
Colin McDonnell - Designing the perfect TypeScript schema validation library (March 8, 2020)
With ZodRPC, Colin hoped to build a new library that would extend the functionality of Zod to the point of offering an alternative to GraphQL. The key to the project’s success would be retaining the simplicity of RPC calls which consist of only named functions that accept arguments and return values.
Colin knew ZodRPC (later renamed to tRPC) had the potential to provide a similar experience to GraphQL’s end to end type-safety but without all the associated tooling and boilerplate code accompanying most GraphQL projects. Here is how he described it in Building an end-to-end type-safe API without GraphQL (June 13, 2021):
Most people use GraphQL as a massively over-engineered way to share the type signature of their API with your client. What if you could import that type signature directly into your client using plain ole
importsyntax? Well… you can.
Colin didn’t continue to maintain the project and essentially abandoned it. Alex “KATT” Johansson then found the repo after finding a tweet by Colin with a small proof of concept containing two to three files. Alex decided to fork it rather than do his own thing since he hoped he wouldn’t be alone.
Having already contributed to Blitz, the idea already resonated with the approach he was looking for, especially the data layer. Alex has been maintaining the project ever since. It has gained a large cult following in the time since Alex took over the project and his leadership has been so inextricably integral to the project that many assume that he created the project.
Similarities & Differences with GraphQL
Throughout 2022, tRPC was increasingly pitted against GraphQL as an existential threat ironically mirroring the evangelism of GraphQL over REST over half a decade ago. I’ve recently been seeing lots of mea culpas and “I told you so’s” on GraphQL due to the current rise of tRPC.
But I’ve seen reasonable takes from developers (only some of which work for GraphQL companies) who believe in the staying power of GraphQL and argue it still has unique strengths that make it a superior choice over tRPC in certain cases. This topic would require an entirely separate blog post to thoroughly analyze the disparate considerations.
In lieu of that post, I’ll quickly highlight a few of the resources already available on this topic and direct the readers to those links to learn more. First and foremost, here’s how my old StepZen co-worker, Roy Derks, compares the two in Can you compare GraphQL and tRPC? (November 27, 2022):
GraphQL is a query language for your API, while tRPC is a set of libraries for building end-to-end type-safe APIs. GraphQL uses HTTP as a transport layer with GraphQL queries sent as POST requests. It excels in combining multiple data sources into a single query and is often used for data modeling and architecture.
tRPC is not really meant for combining multiple data sources. It’s a set of libraries that use TypeScript to ensure type safety throughout the application. Its primary purpose is making it easy to build end-to-end type-safe applications in a single codebase by using the same types in your frontend and backend.
In The simplicity of tRPC with the power of GraphQL (December 11, 2022), Jens Neuse from Wundergraph says you should consider the following context when deciding whether the strengths of GraphQL outweigh its weaknesses:
The great developer experience of tRPC is achieved by merging two very different concerns into one concept, API implementation and data consumption. It’s important to understand that this is a trade-off. There’s no free lunch. The simplicity of tRPC comes at the cost of flexibility.
With GraphQL, you have to invest a lot more into schema design, but this investment pays off the moment you have to scale your application to many but related pages. By separating API implementation from data fetching it becomes much easier to re-use the same API implementation for different use cases.
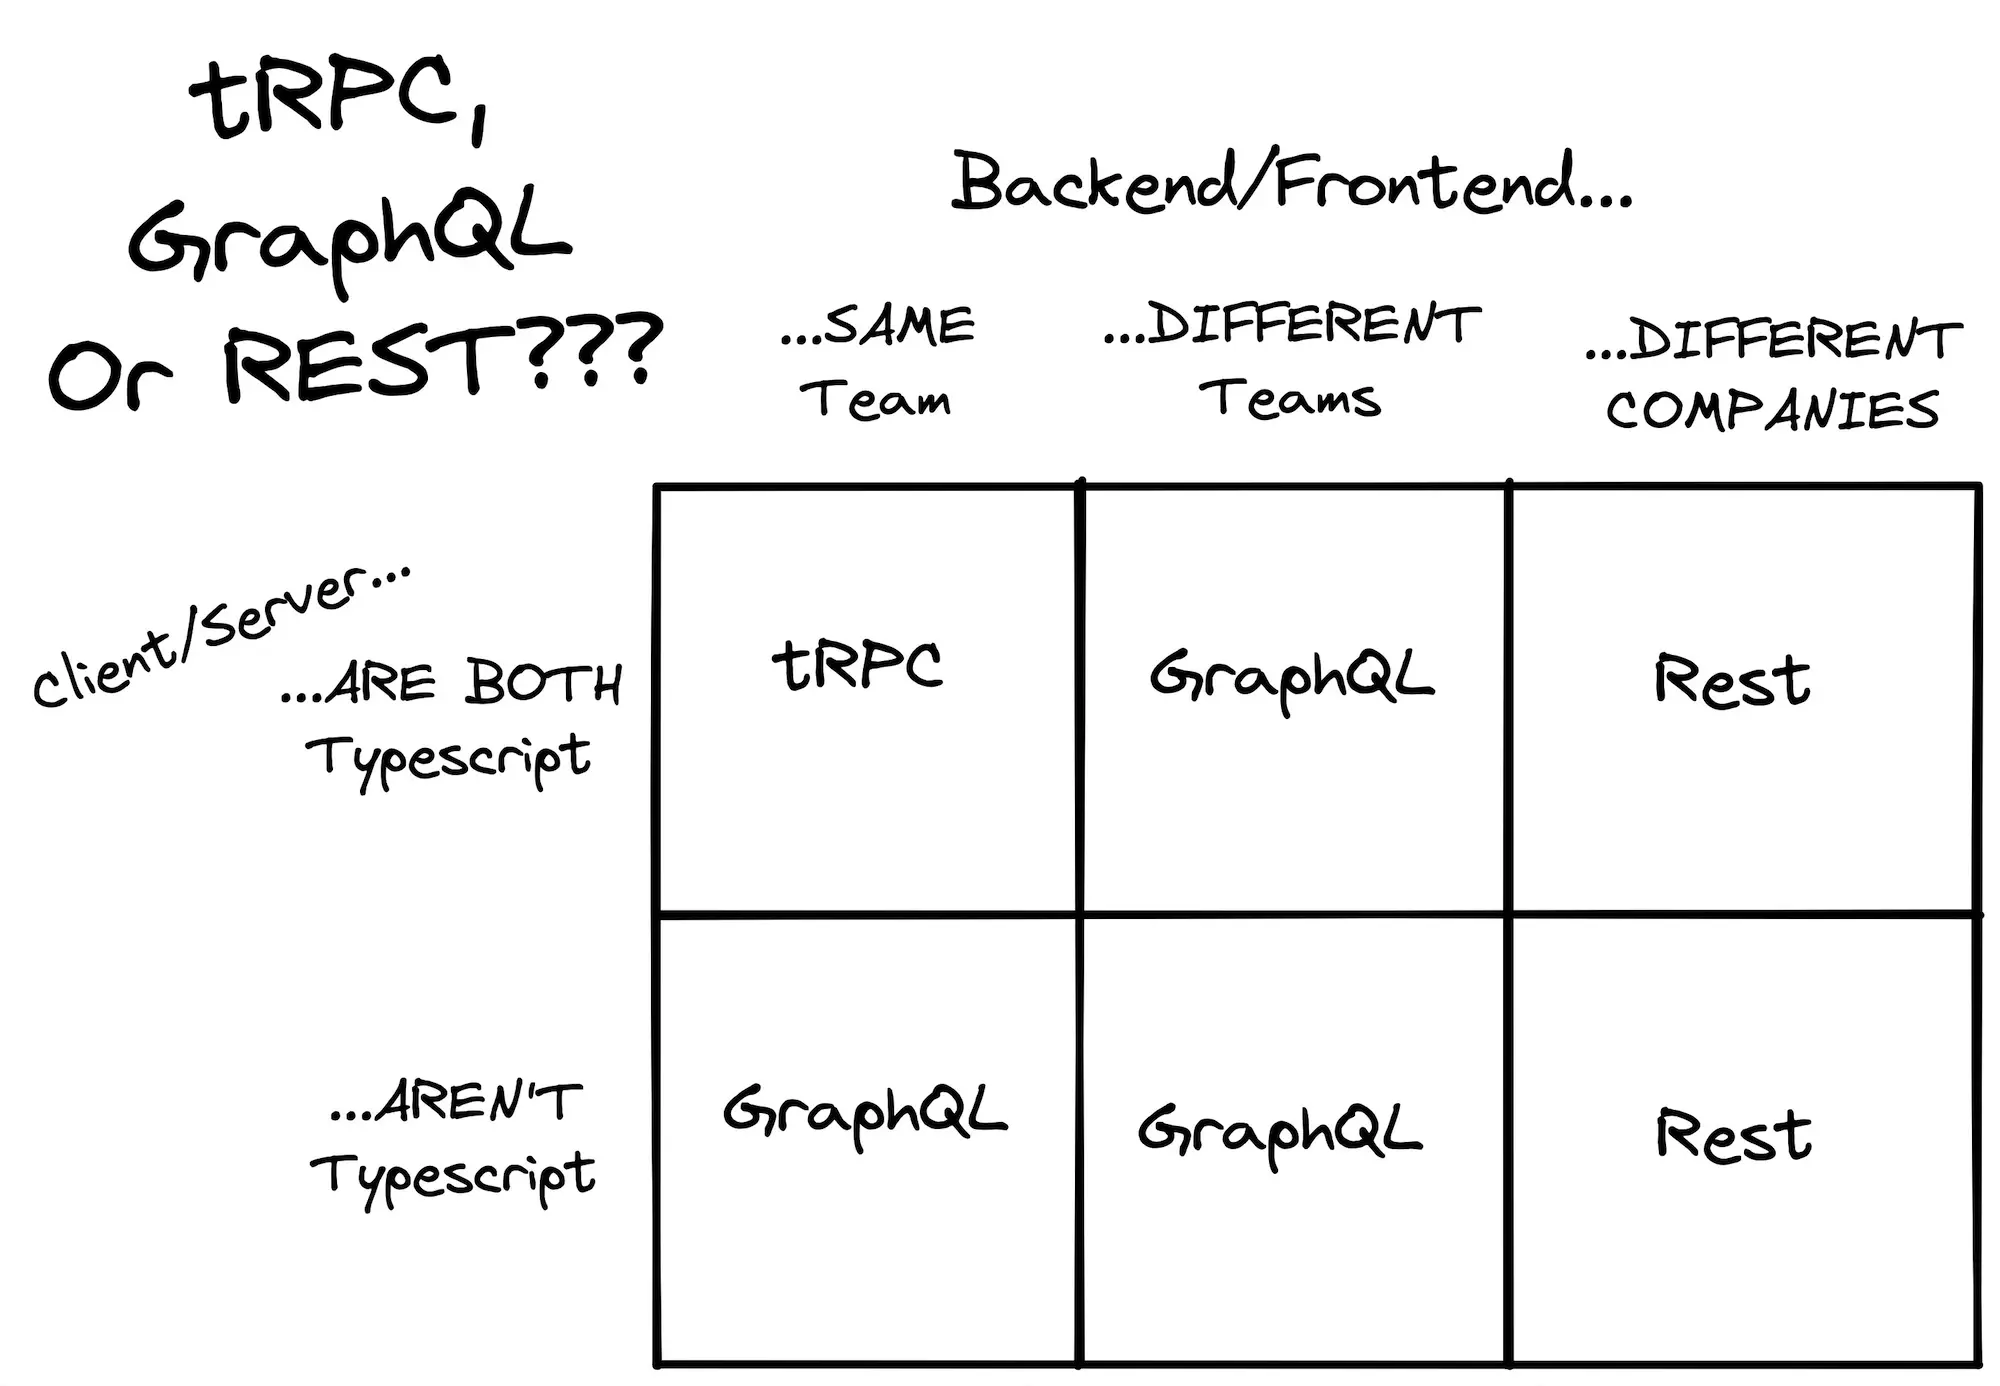
Finally, for the most thorough discussion comparing tRPC and GraphQL I’d recommend watching Theo’s GraphQL, tRPC, and REST video followed by his debate with Max Stoiber, Discussing tRPC & GraphQL. In the months before this debate, Theo tweeted the following chart along with the message:
tRPC is not the death of GraphQL, it just means I reach for it way less :)
Project Setup
To begin, create a blank directory with a .gitignore file and initialize a package.json with pnpm.
mkdir ajcwebdev-trpccd ajcwebdev-trpcecho 'node_modules\n.DS_Store\n.env' >> .gitignorepnpm initConfigure Node & TypeScript
We’ll add three scripts to our project’s package.json. These perform the following commands:
dev:server- runs the development server withtsxbuild:server- creates a bundle indiststart:server- runs the bundle generated indist
{ "name": "ajcwebdev-trpc", "description": "An example tRPC project", "keywords": [ "tRPC", "Zod", "React", "Nextjs" ], "author": "Anthony Campolo", "license": "MIT", "scripts": { "dev:server": "tsx watch src/server/index.ts", "build:server": "tsc", "start:server": "node dist/index.js" }}- For the server side dependencies we’ll install tRPC’s server implementation
@trpc/serverandzod. - For development dependencies on the server we’ll install
npm-run-all,tsx,typescript, and@types/nodefor the Node.jsDefinitelyTypedtype definitions.
pnpm add @trpc/server zod superjsonpnpm add -D @types/node tsx typescript npm-run-allCreate a tsconfig.json file for your TypeScript configuration on the server.
echo >> tsconfig.jsonInclude the following compiler options which I copy pasted from a tRPC example app and do not understand at all.
{ "compilerOptions": { "outDir": "./dist", "moduleResolution": "node", "strict": true, "lib": ["DOM", "DOM.Iterable", "ESNext"], "module": "esnext", "target": "esnext", "declaration": true, "skipLibCheck": true, "forceConsistentCasingInFileNames": true, "resolveJsonModule": true, "isolatedModules": true, "noEmit": true, "jsx": "react-jsx" }, "exclude": ["node_modules"], "include": ["src", "vite.config.ts"]}Create Project Files
For a Hello World example, we can create an entire server in a single index.ts file. After demonstrating how to do this, we’ll break apart the server into multiple files in a structure that reflects the organization of larger, real world tRPC applications.
mkdir src src/serverecho >> src/server/index.tsSince we’ll create a client application later in the tutorial, the index.ts server file is placed in a directory called server to differentiate between the two sides.
Create HTTP Server
initTRPC initializes a tRPC variable t which can setup a request context, metadata, or runtime configuration. createHTTPServer is imported from the standalone adapter in @trpc/server and used to initialize an HTTP server with Node.js.
import { initTRPC } from '@trpc/server'import { createHTTPServer } from '@trpc/server/adapters/standalone'
const t = initTRPC.create()const router = t.routerconst publicProcedure = t.procedure
const helloRouter = publicProcedure.query(  () => `hello from trpc standalone http server`)
const appRouter = router({  hello: helloRouter})
export type AppRouter = typeof appRouter
const { listen } = createHTTPServer({  router: appRouter})
const PORT = 2022console.log(`listening on localhost:${PORT}`)listen(PORT)
There are adapters for other Node environments including:
There are also a set of adapters that utilize the Fetch API including:
Run Node HTTP Server
Start the Node server located in index.ts with tsx in watch mode by running pnpm dev:server. The terminal should display a message saying, listening on localhost:2022:
pnpm dev:serverWith cURL, perform a GET request on http://localhost:2022/hello to receive a JSON response from the hello route. I included the expected output as well with a comment under the curl command:
curl "http://localhost:2022/hello"# {"result":{"data":"hello from trpc standalone http server"}}As our project grows and more routes are added, it will be more maintainable to break apart pieces of the code into multiple, modular files. In the next section, we’ll do just this.
Create Context & Hello Router
A common way to structure a tRPC project includes a clear delineation between individual routes and any tRPC specific boilerplate code necessary for setting up a project with the library. Create a file called context.ts.
echo >> src/server/context.tstRPC should be initialized exactly once per application with initTRPC. If you initialize more than one instance of tRPC you could potentially run into issues. By creating only one tRPC instance, we’ll ensure that the tRPC initialization step is encapsulated.
import { initTRPC } from '@trpc/server'
const t = initTRPC.create()
export const router = t.routerexport const publicProcedure = t.procedure
After running .create() on initTRPC, we export router a publicProcedure variables but without any routes or procedures yet. Since the fundamental unit of a tRPC-based API is a router, we’ll create a routes directory and hello.ts file for defining a router called helloRouter.
mkdir src/server/routesecho >> src/server/routes/hello.tsA router will contain a procedure that exposes an API “endpoint.” Import publicProcedure from context.ts.
import { publicProcedure } from '../context'
export const helloRouter = publicProcedure.query(  () => `hello from the hello route`)
Import helloRouter and create a hello route by setting helloRouter to hello in the router object.
import { router } from './context'import { createHTTPServer } from '@trpc/server/adapters/standalone'import { helloRouter } from './routes/hello'
const PORT = 2022
const appRouter = router({  hello: helloRouter})
export type AppRouter = typeof appRouter
const { listen } = createHTTPServer({  router: appRouter,})
console.log(`listening on localhost:${PORT}`)listen(PORT)
Run the cURL request again to see the new output. See comment for expected output.
curl "http://localhost:2022/hello"# {"result":{"data":"hello from the hello route"}}Add Input Validation with Zod
As mentioned in the introduction, Zod is a library for schema declaration and validation. It can create a “schema” that broadly refers to any data type which can be declared with static types in TypeScript. It comes with a handful of built-in primitive types that are commonly used in TypeScript projects:
- Primitive values include
string,number,bigint,boolean,date, andsymbol. - Empty types include
undefined,null, andvoidwhich acceptsundefined. anyandunknownare catch-all types that allow any values.neverdoes not allow any values.
import { publicProcedure } from '../context'import { z } from 'zod'
export const helloRouter = publicProcedure  .input(    z.string().nullish()  )  .query(({ input }) => {    return `hello from the ${input ?? 'query fallback'}`  })
If you were to query http://localhost:2022/hello again, the data object would contain a string with the message hello from the query fallback. But we can also pass an input to change the resulting message. Run the cURL request one more time but with a URL encoded string input to see the new output.
curl "http://localhost:2022/hello?input=%22input%22"# {"result":{"data":"hello from the input"}}What if we wanted to validate something more complex than a single string? We can change z.string to z.object and specify a key-value pair where the key is name and the value is a string containing a name.
import { publicProcedure } from '../context'import { z } from 'zod'
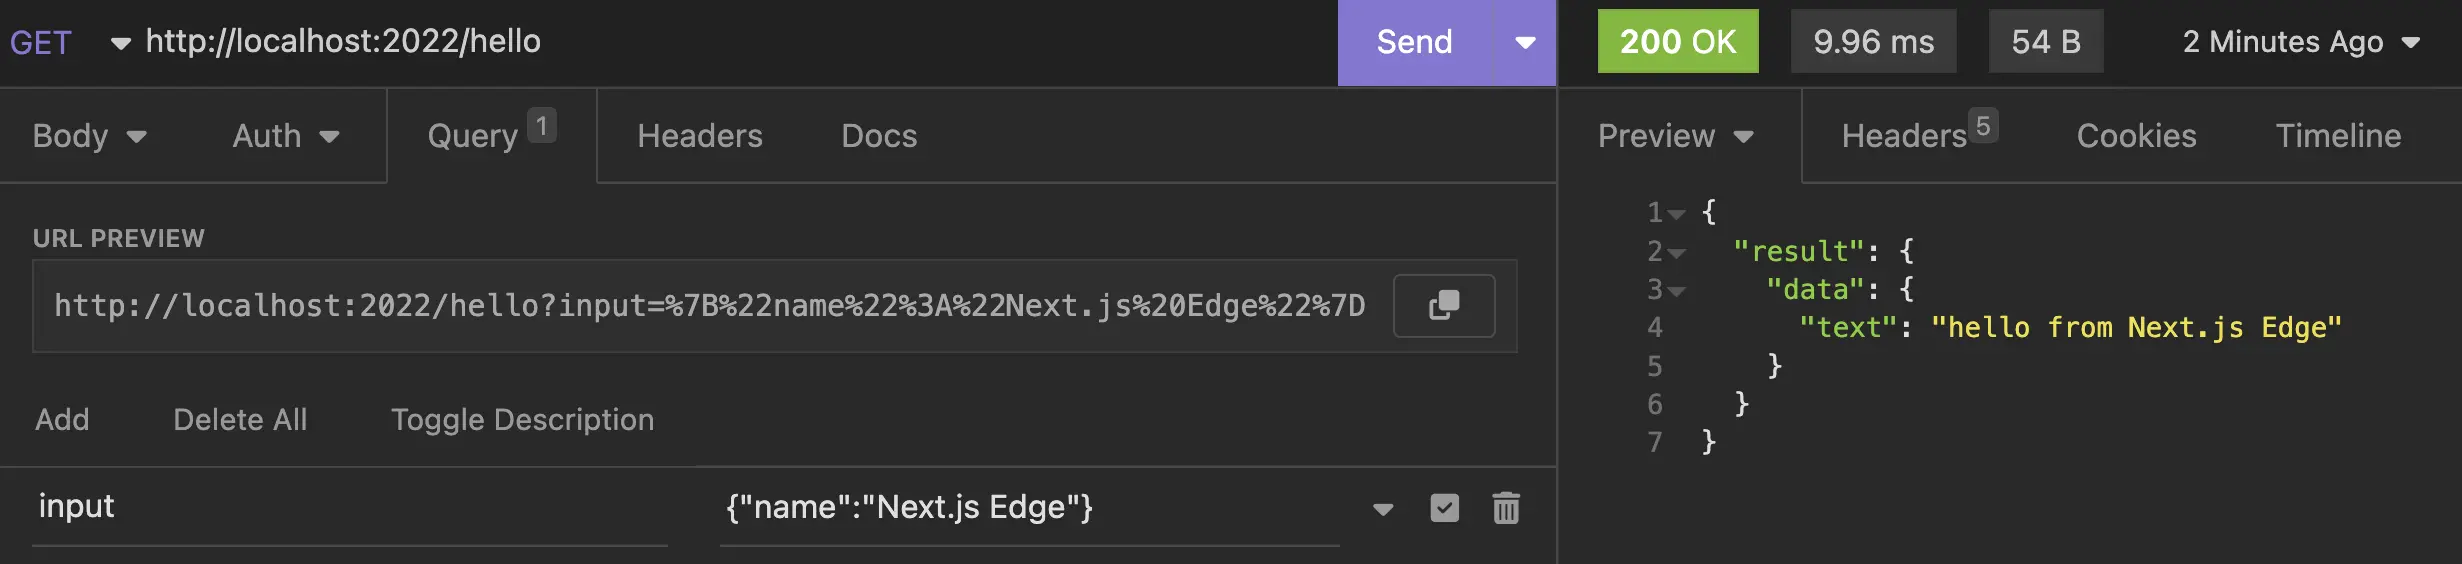
export const helloRouter = publicProcedure .input( z.object({ name: z.string().nullish() }) ) .query(({ input }) => { return { text: `hello from ${input?.name ?? 'input fallback'}` } })This time when you run curl you will receive an array containing a result object with the key-value pair set to data.
curl "http://localhost:2022/hello?batch=1&input=%7B%220%22%3A%7B%22name%22%3A%22Next.js%20Edge%22%7D%7D"# [{"result":{"data":{"text":"hello from Next.js Edge"}}}]Since managing all the URL encoding is a huge pain, you can also use a tool like Insomnia or Postman to make HTTP requests with JSON objects as the input.
Final project structure for a standalone Node server.
.├── src│ └── server│ ├── context.ts│ ├── index.ts│ └── routes│ └── hello.ts├── package.json└── tsconfig.jsonCreate React Client
Create a set of strongly-typed React hooks from your AppRouter type signature with createTRPCReact. This initializes a trpc client instance from @trpc/react-query which provides a thin wrapper over @tanstack/react-query.
We’ll be installing the following project dependencies for the client side:
react- the React core libraryreact-dom- React’s DOM rendering library@trpc/client- tRPC’s client implementation@trpc/react-query- tRPC’s React Query wrapper@tanstack/react-query- TanStack’s React Query
For development dependencies on the client we’ll be installing:
vite@vitejs/plugin-react- Types for
@types/reactand@types/react-dom
pnpm add @tanstack/react-query @trpc/client @trpc/react-query react react-dompnpm add -D @vitejs/plugin-react vite @types/react @types/react-domReplace your current project scripts with the following:
{ "scripts": { "dev:server": "tsx watch src/server/index.ts", "build:server": "tsc", "start:server": "node dist/index.js", "dev:client": "vite", "build:client": "tsc && vite build", "start:client": "vite preview", "dev": "run-p dev:*", "build": "run-s build:server build:client", "start": "run-p start:*" }}Your React application, much like your tRPC application, can be organized in any fashion you prefer. For this example, I’m going to structure the files and directories like a Next.js project specifically a project using the pages directory. This way, we can seamlessly migrate to Next.js in the final next section.
Configure Vite Root Component
Create a file called _app.tsx inside src/pages.
mkdir src/pagesecho >> src/pages/_app.tsxCreate the following files as well:
vite-env.d.tsvite.config.tsindex.html
echo '/// <reference types="vite/client" />' >> vite-env.d.tsecho >> vite.config.tsecho >> index.htmlIn the vite.config.ts configuration file, import react from @vitejs/plugin-react and set it to plugins in the defineConfig object.
import react from '@vitejs/plugin-react'import { defineConfig } from 'vite'
export default defineConfig({  plugins: [react()]})
The boilerplate HTML page imports a root component from src/pages/_app.tsx and renders it into a div element. In the next section, we’ll write the code for our _app.tsx file.
<!DOCTYPE html><html lang="en"> <head> <meta charset="utf-8" /> <meta name="viewport" content="width=device-width, initial-scale=1" /> <meta name="description" content="An example tRPC application." /> <title>A First Look at tRPC</title> </head> <body> <noscript>You need to enable JavaScript to run this app.</noscript> <div id="root"></div> <script src="/src/pages/_app.tsx" type="module"></script> </body></html>In _app.tsx, we will use createRoot to render the root component containing the Index component. This root component imports and returns an HTML paragraph element from another file which represents our homepage.
import { StrictMode } from 'react'import { createRoot } from 'react-dom/client'import Index from "./index"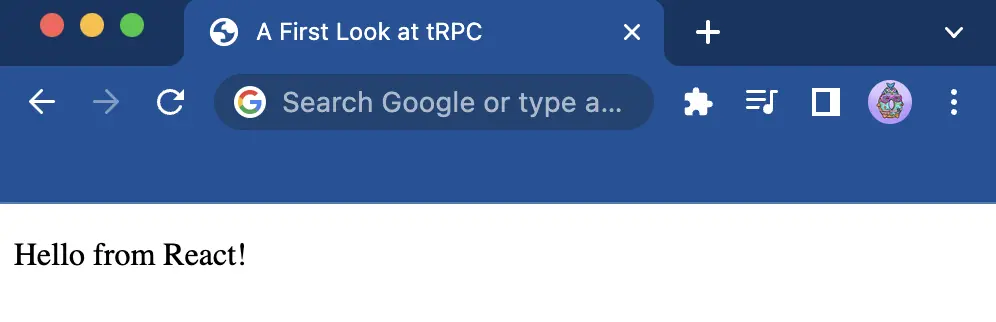
createRoot(document.getElementById('root') as HTMLElement).render( <StrictMode> <Index /> </StrictMode>)echo >> src/pages/index.tsxThe Index component will return a message saying, Hello from React!.
export default function Index() { return <p>Hello from React!</p>}The server should still be running with the previous pnpm dev:server command. Run the following command to start up the development server for the React client.
pnpm dev:clientOpen localhost:5173 to see the React app.
Create Tanstack Query Client
Create a components folder and then a Hello.tsx component inside that folder.
mkdir src/componentsecho >> src/components/Hello.tsxIn Hello.tsx, we’ll import api from pages/index, run useQuery on api.hello, and input a key-value pair with the key name and a value containing a string message.
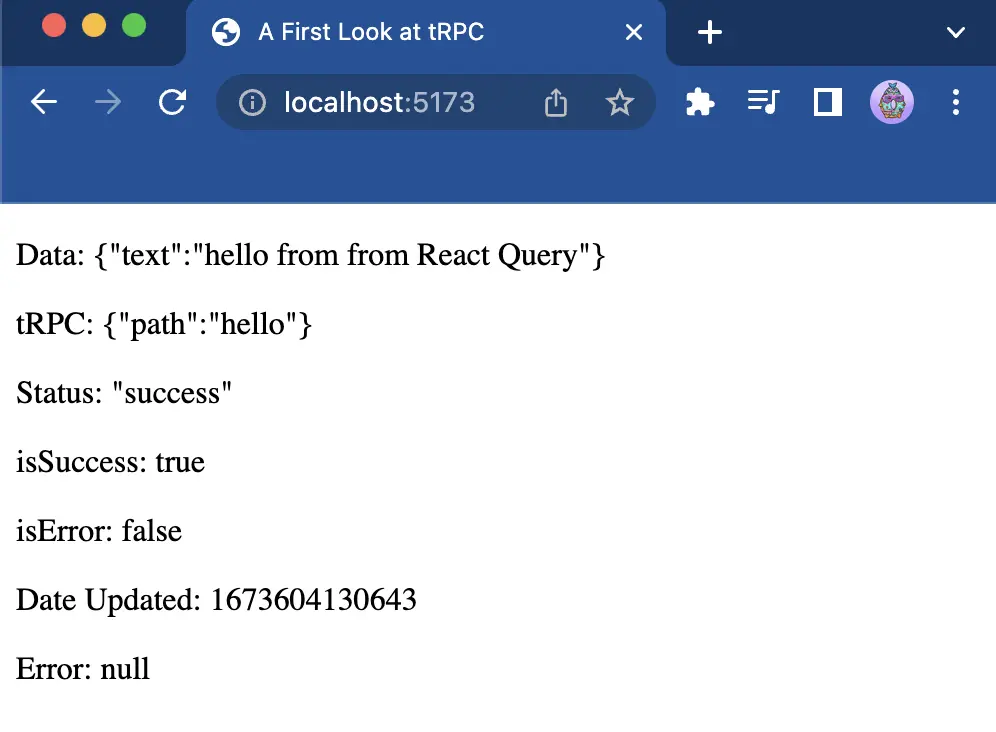
import { api } from "../pages/index"
export function Hello() {  const hello = api.hello.useQuery({ name: "React Query" })  // console.log(hello)  const { data, status, isSuccess, isError, error } = hello  return (    <>      <h3>Data Object</h3>      <ul>        <li><code>hello.data</code>: <b>{JSON.stringify(data)}</b></li>        <li><code>hello.data?.text</code>: <b>{JSON.stringify(data?.text)}</b></li>      </ul>
      <h3>Status Values</h3>      <ul>        <li><code>hello.status</code>: <b>{JSON.stringify(status)}</b></li>        <li><code>hello.isSuccess</code>: <b>{JSON.stringify(isSuccess)}</b></li>        <li><code>hello.isError</code>: <b>{JSON.stringify(isError)}</b></li>        <li><code>hello.error</code>: <b>{JSON.stringify(error)}</b></li>      </ul>    </>  )}
For this to work we’ll need to initialize the TanStack Query client in index.tsx. QueryClient is used to interact with React Query’s cache and QueryClientProvider connects and provides QueryClient to the application.
httpBatchLink is a terminating link that batches an array of individual tRPC operations into a single HTTP request that’s sent to a single tRPC procedure. The terminating link is the last link in a link chain. Instead of calling the next function, the terminating link is responsible for sending your composed tRPC operation to the tRPC server and returning an OperationResultEnvelope.
import { QueryClient, QueryClientProvider } from '@tanstack/react-query'import { createTRPCReact } from '@trpc/react-query'import { httpBatchLink } from '@trpc/client'import { useState } from 'react'import type { AppRouter } from '../server'import { Hello } from "../components/Hello"
export const api = createTRPCReact<AppRouter>()
export default function Index() {  const [ queryClient ] = useState(() => new QueryClient())  const [ trpcClient ] = useState(() => api.createClient({    links: [      httpBatchLink({ url: 'http://localhost:2022' })    ]  }))
  return (    <api.Provider client={trpcClient} queryClient={queryClient}>      <QueryClientProvider client={queryClient}>        <Hello />      </QueryClientProvider>    </api.Provider>  )}
The links array added to the tRPC client config should have at least one link and that link should be a terminating link. If links don’t have a terminating link at the end of them, the tRPC operation will not be sent to the tRPC server. At this point you’ll get the following error in your browser console:
Access to fetch at
http://localhost:2022/hello?...from originhttp://127.0.0.1:5173has been blocked by CORS policy. Response to preflight request doesn’t pass access control check.No
Access-Control-Allow-Originheader is present on requested resource. If an opaque response serves your needs, set request’s mode tono-corsto fetch resource with CORS disabled.
Oh no, CORS! Don’t worry, I won’t make you spend the next half hour reading the Cross-Origin Resource Sharing page on MDN for the 50th time. We’ll create an HTTP handler and set the correct access headers.
Create HTTP Handler
The createContext() function is called for each request and the result is propagated to all resolvers. You can use this to pass contextual data down to the resolvers.
import { router } from './context'import { createHTTPHandler } from '@trpc/server/adapters/standalone'import { helloRouter } from './routes/hello'import http from 'http'
const appRouter = router({  hello: helloRouter})
export type AppRouter = typeof appRouter
const handler = createHTTPHandler({  router: appRouter})
const server = http.createServer((req, res) => {  res.setHeader('Access-Control-Allow-Origin', '*')  res.setHeader('Access-Control-Request-Method', '*')  res.setHeader('Access-Control-Allow-Methods', 'OPTIONS, GET')  res.setHeader('Access-Control-Allow-Headers', '*')  if (req.method === 'OPTIONS') {    res.writeHead(200)    return res.end()  }  handler(req, res)})
const PORT = 2022server.listen(PORT, () => {  console.log(`listening on localhost:${PORT}`)})
Simultaneously run the server on localhost:3000 and the client on localhost:5173 with pnpm dev.
pnpm devRight now I’m displaying a few pieces of information contained in the data object that is returned by useQuery.
The data object holds a bunch of stuff you may or may not need depending on what you are querying. I’d recommend using a console.log on the data object at least once to see all the properties, but here’s a few of the most common you’ll likely use while getting started with tRPC.
{ "status": "success", "fetchStatus": "idle", "isLoading": false, "isSuccess": true, "isError": false, "data": { "text": "hello from from React Query" }, "error": null, "trpc": { "path": "hello" }}Final project structure for fullstack tRPC application with a React frontend and Node backend.
.├── src│ ├── components│ │ └── Hello.tsx│ ├── pages│ │ ├── _app.tsx│ │ └── index.tsx│ └── server│ ├── context.ts│ ├── index.ts│ └── routes│ └── hello.ts├── index.html├── package.json├── tsconfig.json├── vite-env.d.ts└── vite.config.tsMigrate to Next
We’ve now seen how to create a standalone HTTP server with tRPC and a client application that queries the server with React. Lets use Next.js to migrate our server into API routes and query them with @trpc/next.
Configure Project for Next
pnpm add @trpc/next nextSince Next includes a “server side” and a “client side,” we no longer need separate scripts for tRPC and React. Replace the previous scripts with the following:
{ "scripts": { "dev": "next dev", "build": "next build", "start": "next start" }}Create a file called next-env.d.ts for Next’s reference types. This file should not be edited, see the Next.js TypeScript documentation for more information.
echo '/// <reference types="next" />\n/// <reference types="next/image-types/global" />' >> next-env.d.tsConfigure Vercel Edge Runtime
We no longer need to worry about managing CORS or setting headers on our responses at all since Next.js will now manage that. We can remove everything except the appRouter and AppRouter type from src/server/index.ts since we don’t need to run the server from this file anymore.
import { router } from './context'import { helloRouter } from './routes/hello'
export const appRouter = router({  hello: helloRouter})
export type AppRouter = typeof appRouter
Instead of running a standalone Node server, we’ll create an API Route in the src/pages/api directory called [trpc].ts.
mkdir src/pages/apiecho >> src/pages/api/\[trpc\].tsxThe api directory is a Next.js convention for creating a public API that executes backend JavaScript code in an isolated and fully managed environment. In this case, the code to run will be a Node function that makes a fetch request via tRPC’s fetchRequestHandler.
import { fetchRequestHandler } from '@trpc/server/adapters/fetch'import { NextRequest } from 'next/server'import { appRouter } from '../../server/index'
export default async function handler(req: NextRequest) {  return fetchRequestHandler({})}
Set the endpoint to /api and the router to appRouter. In createContext an arrow function is run that returns an empty JavaScript object and nothing else. We also set the runtime to edge inside our config object because this example uses the Next.js Edge Runtime via tRPC’s fetch adapter.
import { fetchRequestHandler } from '@trpc/server/adapters/fetch'import { NextRequest } from 'next/server'import { appRouter } from '../../server/index'
export default async function handler(req: NextRequest) {  return fetchRequestHandler({    endpoint: '/api',    router: appRouter,    req,    createContext: () => ({}),  })}
export const config = {  runtime: 'edge'}
Edit the Hello.tsx component in src/components.
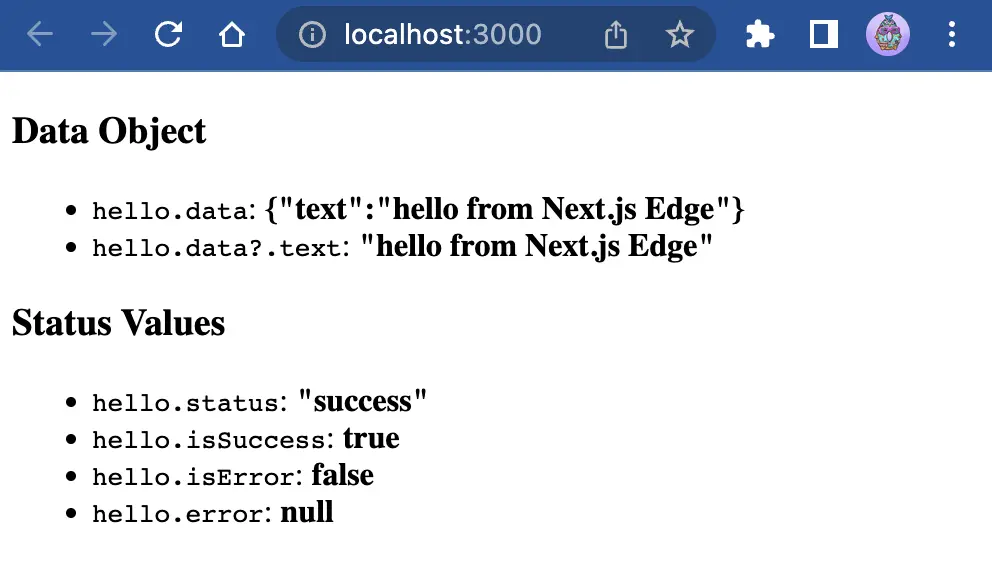
import { api } from "../pages/index"
export function Hello() {  const hello = api.hello.useQuery({ name: "Next.js Edge" })  const { data, status, isSuccess, isError, error } = hello
  if (!data) {    return <h3>Loading...</h3>  }
  return (    <div>      <h3>Data Object</h3>      <ul>        <li><code>hello.data</code>: <b>{JSON.stringify(data)}</b></li>        <li><code>hello.data?.text</code>: <b>{JSON.stringify(data?.text)}</b></li>      </ul>      <h3>Status Values</h3>      <ul>        <li><code>hello.status</code>: <b>{JSON.stringify(status)}</b></li>        <li><code>hello.isSuccess</code>: <b>{JSON.stringify(isSuccess)}</b></li>        <li><code>hello.isError</code>: <b>{JSON.stringify(isError)}</b></li>        <li><code>hello.error</code>: <b>{JSON.stringify(error)}</b></li>      </ul>    </div>  )}
Import createTRPCNext from @trpc/next and initialize the client to a variable called api. The config argument is a function returning an object to configure the tRPC client. The returned value includes the links property to customize the flow of data in tRPC between the client and server.
import { httpBatchLink } from '@trpc/client'import { createTRPCNext } from '@trpc/next'import type { AppRouter } from '../server/index'import { Hello } from "../components/Hello"
function getBaseUrl() {  if (typeof window !== 'undefined') {    return ''  }  if (process.env.VERCEL_URL) {    return `https://${process.env.VERCEL_URL}`  }  return `http://localhost:${process.env.PORT ?? 3000}`}
export const api = createTRPCNext<AppRouter>({  config() {    return {      links: [ httpBatchLink({ url: getBaseUrl() + '/api' }) ]    }  },  ssr: false})
export default function Index() {  return (    <><Hello /></>  )}
Lastly, import api from src/pages/index.tsx and pass MyApp to the withTRPC() higher-order component.
import type { AppType } from 'next/app'import { api } from './index'
const MyApp: AppType = ({ Component, pageProps }) => {  return <Component {...pageProps} />}
export default api.withTRPC(MyApp)
Open localhost:3000.
Deploy to Vercel
TypeScript decided to yuck my yum at the last minute and gave the following error:
Type error: The inferred type of
apicannot be named without a reference to.pnpm/@trpc+react-query@10.14.1_ldv44zvqpibs4fctxfwnszfeji/node_modules/@trpc/react-query/shared. This is likely not portable. A type annotation is necessary.
This blog post is already long enough so instead of doing the responsible thing and fixing this error I’m going to turn off TypeScript build errors with a next.config.js file.
echo >> next.config.jsSet ignoreBuildErrors to true and prepare an apology tweet for the thousands of developers you just infuriated.
module.exports = { typescript: { ignoreBuildErrors: true, },}Install the vercel CLI as a project dependency and build your project’s output. Then deploy to staging with the --prebuilt option and finally deploy to production with the --prod option.
pnpm add -D vercelpnpm vercel buildpnpm vercel --prebuiltpnpm vercel deploy --prodOpen ajcwebdev-trpc.vercel.app to see your deployed app and run the following curl command to send a request to your api handler. If you followed along correctly and everything worked as intended you should get the commented output:
curl "https://ajcwebdev-trpc.vercel.app/api/hello?batch=1&input=%7B%220%22%3A%7B%22name%22%3A%22Next.js%20Edge%22%7D%7D"# [{"result":{"data":{"text":"hello from Next.js Edge"}}}]