
A First Look at IPFS
IPFS is a protocol defining a cryptographic-hashed and content-addressed peer-to-peer filesystem for directories and files
All of this project's code can be found in the First Look monorepo on my GitHub.
Introduction
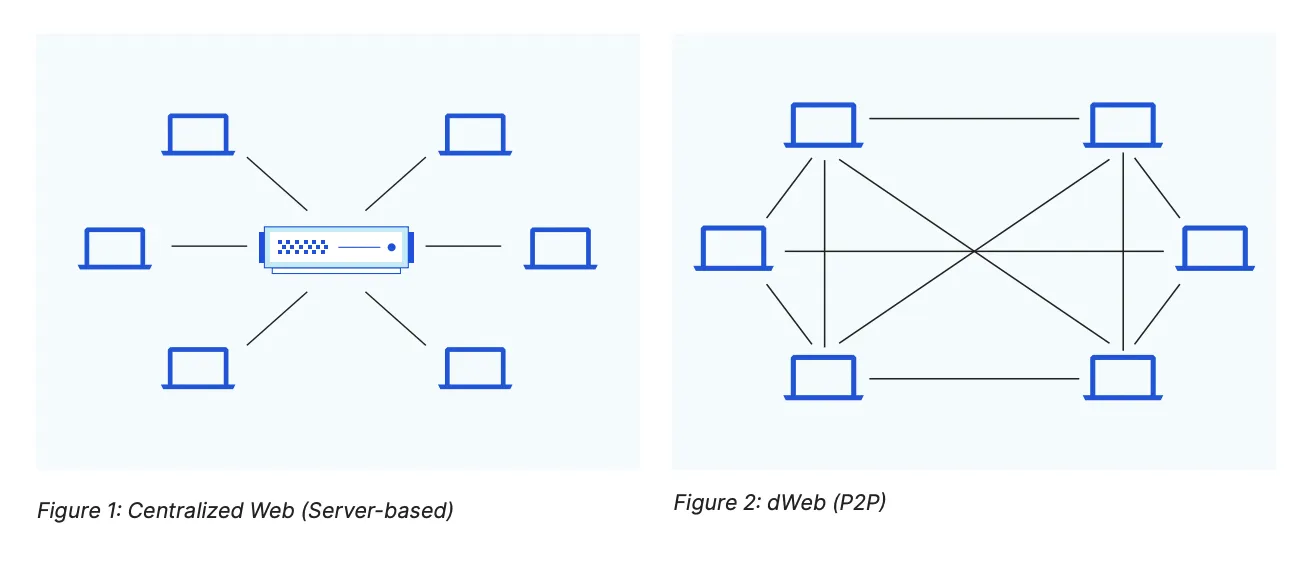
The InterPlanetary File System (or IPFS) is a global, versioned, peer-to-peer filesystem that incorporates ideas from Git, BitTorrent, Kademlia, and the Web. It includes a name service inspired by DNS called the InterPlanetary Name System (or IPNS).
According to the docs:
IPFS is a protocol defining a cryptographic-hashed, content-addressed file system for directories and files. It is like a single BitTorrent swarm exchanging git objects with an interface similar to the HTTP web. It is a connection layer over other network protocols and can be used for peer-to-peer file transfers or as a web document viewer.
IPFS allows you to request data from any IPFS node using the data's CID or content identifier. This process usually involves a lookup on a distributed hash table using libp2p. The lookup table is split across all the peers in a distributed network. To find content, you ask these peers.
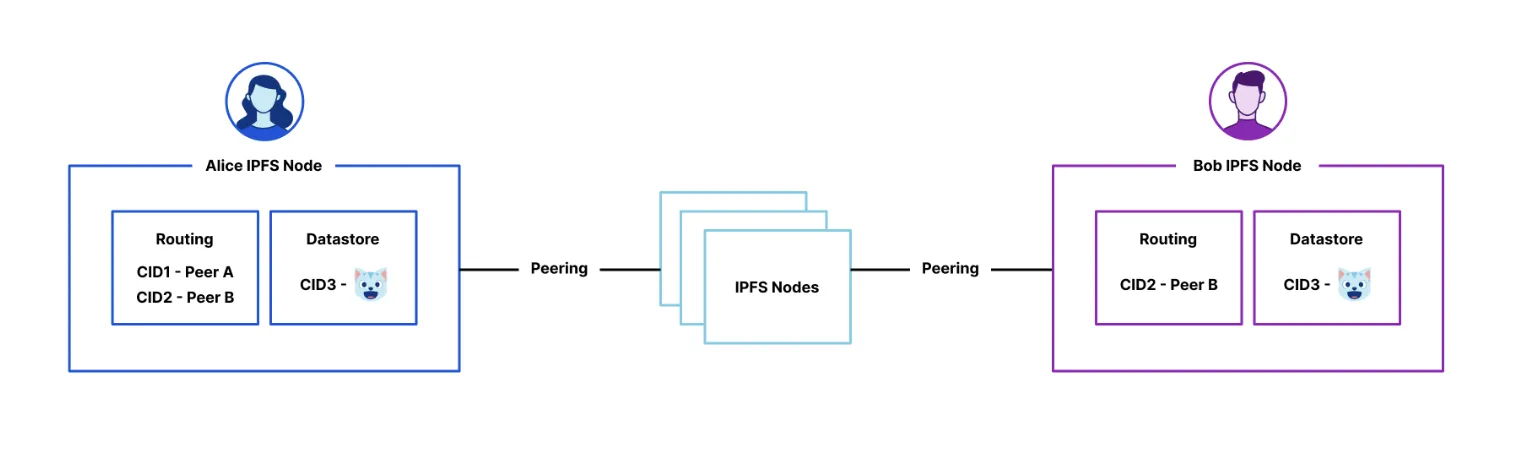
Once you know which peers are storing the blocks that contain the content you want, you use the DHT again to find the current location of those peers.
Getting Started with IPFS
IPFS can be used with IPFS Desktop or through the IPFS CLI. We'll start with the CLI and then take a look at the desktop client.
Install IPFS CLI
You can find installation instructors for your OS on the IPFS docs. Since I am on an M1 I will download the darwin-arm64 binary from IPFS Distributions and then unzip it.
curl -O https://dist.ipfs.tech/go-ipfs/v0.12.0/go-ipfs_v0.12.0_darwin-arm64.tar.gz
tar -xvzf go-ipfs_v0.12.0_darwin-arm64.tar.gz
Run the install.sh script (this may require sudo) and then clean up the installation files.
bash go-ipfs/install.sh
rm -rf go-ipfs go-ipfs_v0.12.0_darwin-arm64.tar.gz
Finally, check the version number to verify it was installed correctly.
ipfs --version
Note: This article was written with version
0.12.0.
Initialize IPFS Repository
ipfs stores all its settings and internal data in a directory that acts like a git repository. It uses a repository in the local file system located at ~/.ipfs by default. The contents of this repository can be checked with the ls ~/.ipfs command. Before using IPFS for the first time, you'll need to initialize the repository with the ipfs init command.
ipfs init
This will output a few pieces of information including your peer identity and the location of your repository on your computer.
generating ED25519 keypair...done
peer identity: 12D3KooWGB1qCtfg5uD6SQwptNHZGKvSaWq2aCZbcy4BGjATir54
initializing IPFS node at /Users/ajcwebdev/.ipfs
to get started, enter:
ipfs cat /ipfs/QmQPeNsJPyVWPFDVHb77w8G42Fvo15z4bG2X8D2GhfbSXc/readme
Hashes like this will be referenced throughout the tutorial. This is a content identifier, or CID. It is a label used to point to material in IPFS. It doesn't indicate where the content is stored. Instead, it forms a kind of address based on the content itself. CIDs are short, regardless of the size of their underlying content.
Get Peer Identity
Other nodes on the network use your peer identity ID to find and connect to you. You can run ipfs id to see your ID and PublicKey.
ipfs id
This will return something like the following:
{
"ID": "12D3KooWGB1qCtfg5uD6SQwptNHZGKvSaWq2aCZbcy4BGjATir54",
"PublicKey": "CAESIF5wUtW0WScYOzaZnoc9Neu5m98I+8mN8p9u9rU+fb93",
"Addresses": null,
"AgentVersion": "go-ipfs/0.12.0/",
"ProtocolVersion": "ipfs/0.1.0",
"Protocols": null
}
List Project Files
Run the following command to see the files in your current directory:
ipfs ls /ipfs/QmQPeNsJPyVWPFDVHb77w8G42Fvo15z4bG2X8D2GhfbSXc
QmQy6xmJhrcC5QLboAcGFcAE1tC8CrwDVkrHdEYJkLscrQ 1681 about
QmYCvbfNbCwFR45HiNP45rwJgvatpiW38D961L5qAhUM5Y 189 contact
QmU5k7ter3RdjZXu3sHghsga1UQtrztnQxmTL22nPnsu3g 311 help
QmejvEPop4D7YUadeGqYWmZxHhLc4JBUCzJJHWMzdcMe2y 4 ping
QmQGiYLVAdSHJQKYFRTJZMG4BXBHqKperaZtyKGmCRLmsF 1681 quick-start
QmPZ9gcCEpqKTo6aq61g2nXGUhM4iCL3ewB6LDXZCtioEB 1091 readme
QmQ5vhrL7uv6tuoN9KeVBwd4PwfQkXdVVmDLUZuTNxqgvm 1162 security-notes
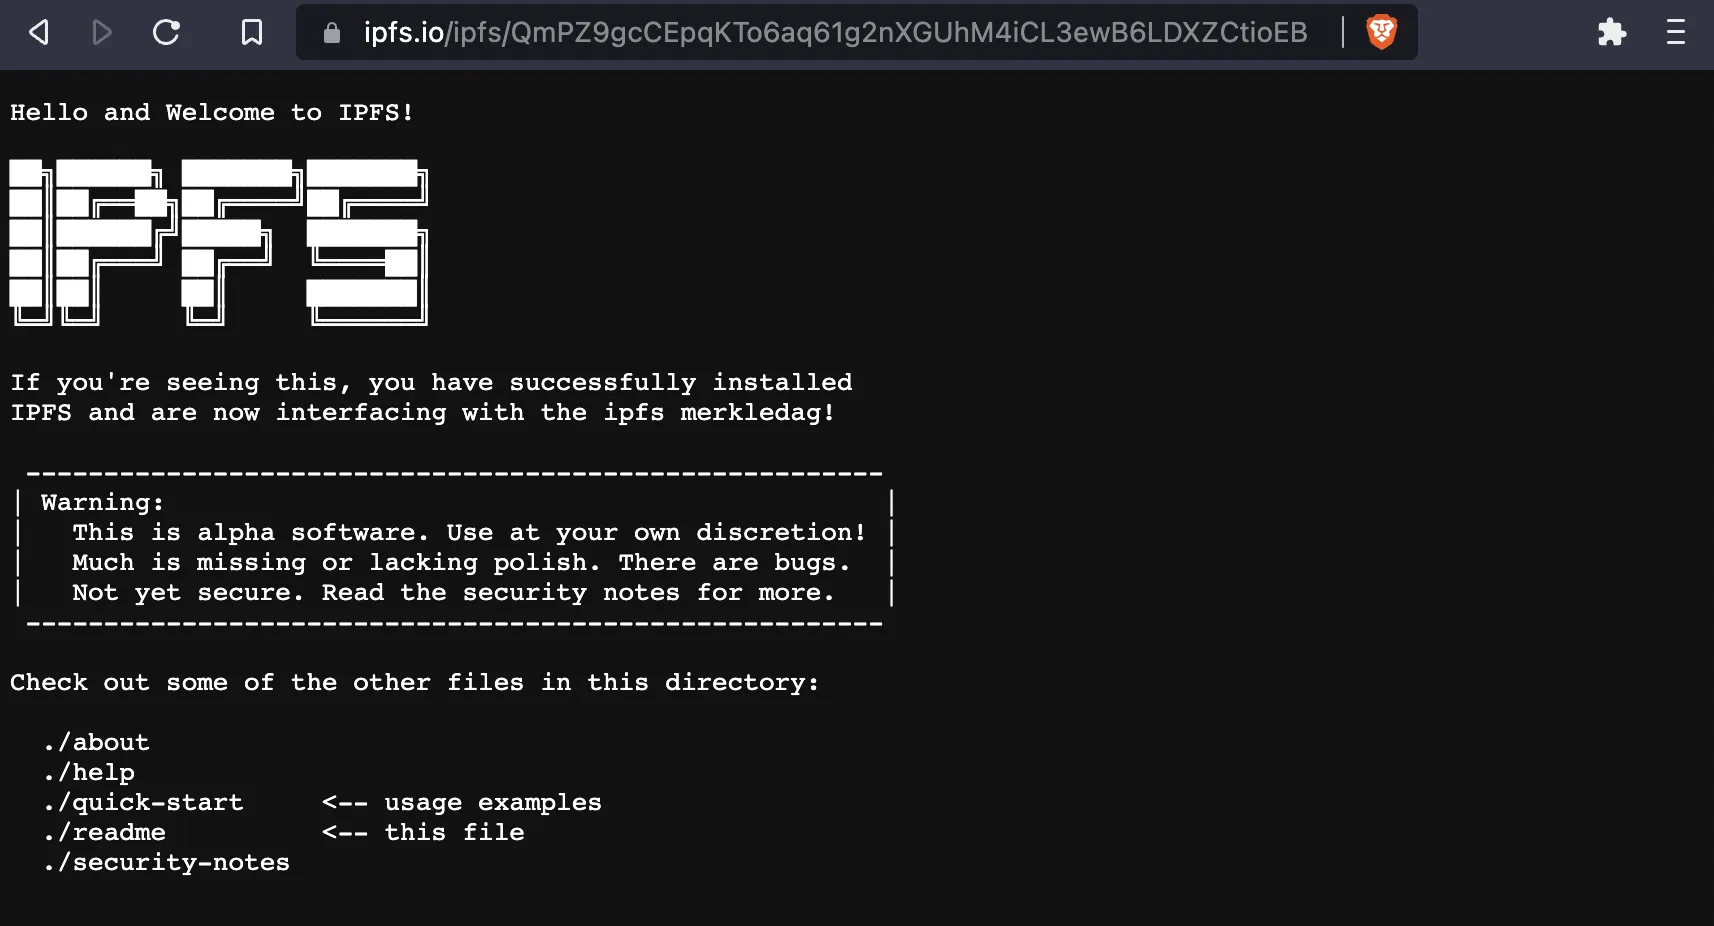
To see getting started instructions, you can view the readme file in two different ways. The first is running ipfs cat <hash>/readme:
ipfs cat QmQPeNsJPyVWPFDVHb77w8G42Fvo15z4bG2X8D2GhfbSXc/readme
Hello and Welcome to IPFS!
██╗██████╗ ███████╗███████╗
██║██╔══██╗██╔════╝██╔════╝
██║██████╔╝█████╗ ███████╗
██║██╔═══╝ ██╔══╝ ╚════██║
██║██║ ██║ ███████║
╚═╝╚═╝ ╚═╝ ╚══════╝
If you're seeing this, you have successfully installed
IPFS and are now interfacing with the ipfs merkledag!
-------------------------------------------------------
| Warning: |
| This is alpha software. Use at your own discretion! |
| Much is missing or lacking polish. There are bugs. |
| Not yet secure. Read the security notes for more. |
-------------------------------------------------------
Check out some of the other files in this directory:
./about
./help
./quick-start <-- usage examples
./readme <-- this file
./security-notes
Alternatively, you can use the hash of the readme file itself:
ipfs cat QmPZ9gcCEpqKTo6aq61g2nXGUhM4iCL3ewB6LDXZCtioEB
Also, at any point you can prefix either of those with https://ipfs.io/ipfs/ to view the content in a browser.
Publish a Website on IPFS
What if we saved an HTML file on IPFS? If IPFS returned browser compatible HTML files, then couldn't we access a piece of content and have it be displayed like any other website?
Create Project Files
Create a new project directory. In the root of the project add an index.html file for the home page:
mkdir ajcwebdev-ipfs
echo '<h2>Example site from A First Look at IPFS</h2>' > ajcwebdev-ipfs/index.html
Create an additional file called about.html for an about page:
echo '<h2>About the InterPlanetary File and Name System</h2>' > ajcwebdev-ipfs/about.html
Add Files and Directories to IPFS
Now that we've created our content, we can specify the <path> of the content we want to upload to IPFS with ipfs add. The -r option (meaning "recursive") is used for adding directories.
ipfs add -r ajcwebdev-ipfs
This will give back a hash for the newly created directory and HTML files.
added QmWV9i6qQVrK3aEEd4PbzME42shTGwZuCdR1DFMD3ZvzsG ajcwebdev-ipfs/about.html
added QmUKwop8CmB4ictvQyCJQru97NRVakJFVWpV74guJ89tcb ajcwebdev-ipfs/index.html
added Qmckpy8mWjWmLB8Jmkpvrmkv3fb4UXZuNZS648bh4fuj4M ajcwebdev-ipfs
List the contents of the directory.
ipfs ls /ipfs/Qmckpy8mWjWmLB8Jmkpvrmkv3fb4UXZuNZS648bh4fuj4M
This will display the HTML files and their hashes.
QmWV9i6qQVrK3aEEd4PbzME42shTGwZuCdR1DFMD3ZvzsG 55 about.html
QmUKwop8CmB4ictvQyCJQru97NRVakJFVWpV74guJ89tcb 48 index.html
View the index.html file with either of the following two commands:
ipfs cat QmUKwop8CmB4ictvQyCJQru97NRVakJFVWpV74guJ89tcb
ipfs cat Qmckpy8mWjWmLB8Jmkpvrmkv3fb4UXZuNZS648bh4fuj4M/index.html
<h2>Example site from A First Look at IPFS</h2>
View the about.html file with either of the following two commands:
ipfs cat QmWV9i6qQVrK3aEEd4PbzME42shTGwZuCdR1DFMD3ZvzsG
ipfs cat Qmckpy8mWjWmLB8Jmkpvrmkv3fb4UXZuNZS648bh4fuj4M/about.html
<h2>About the InterPlanetary File and Name System</h2>
Pin Repository
IPFS nodes periodically garbage collect any content. You must explicitly tell your node which content you'd like to keep. To ensure your content isn't garbage collected, you need to pin it. This will tell your node to cache that content permanently.
ipfs pin add Qmckpy8mWjWmLB8Jmkpvrmkv3fb4UXZuNZS648bh4fuj4M
pinned Qmckpy8mWjWmLB8Jmkpvrmkv3fb4UXZuNZS648bh4fuj4M recursively
List all objects pinned to local storage:
ipfs pin ls
QmUKwop8CmB4ictvQyCJQru97NRVakJFVWpV74guJ89tcb indirect
QmWV9i6qQVrK3aEEd4PbzME42shTGwZuCdR1DFMD3ZvzsG indirect
Qmckpy8mWjWmLB8Jmkpvrmkv3fb4UXZuNZS648bh4fuj4M recursive
Pinning is a large topic that will need its own blog post to thoroughly explain, but for now it's important to note that there are three types of pinned files:
- Direct pins pin just a single block and no others in relation to it.
- Recursive pins pin a given block and all of its children.
- Indirect pins are the result of a given block's parent being pinned recursively.
Start the IPFS Daemon
To run your own IPFS node on your computer, you can use the IPFS Daemon. The local daemon process is automatically started in the CLI with the command ipfs daemon. It creates an $IPFS_PATH/api file with an RPC API address. Start the IPFS daemon with ipfs daemon:
ipfs daemon
Open localhost:5001/webui or enter open http://localhost:5001/webui in your terminal.
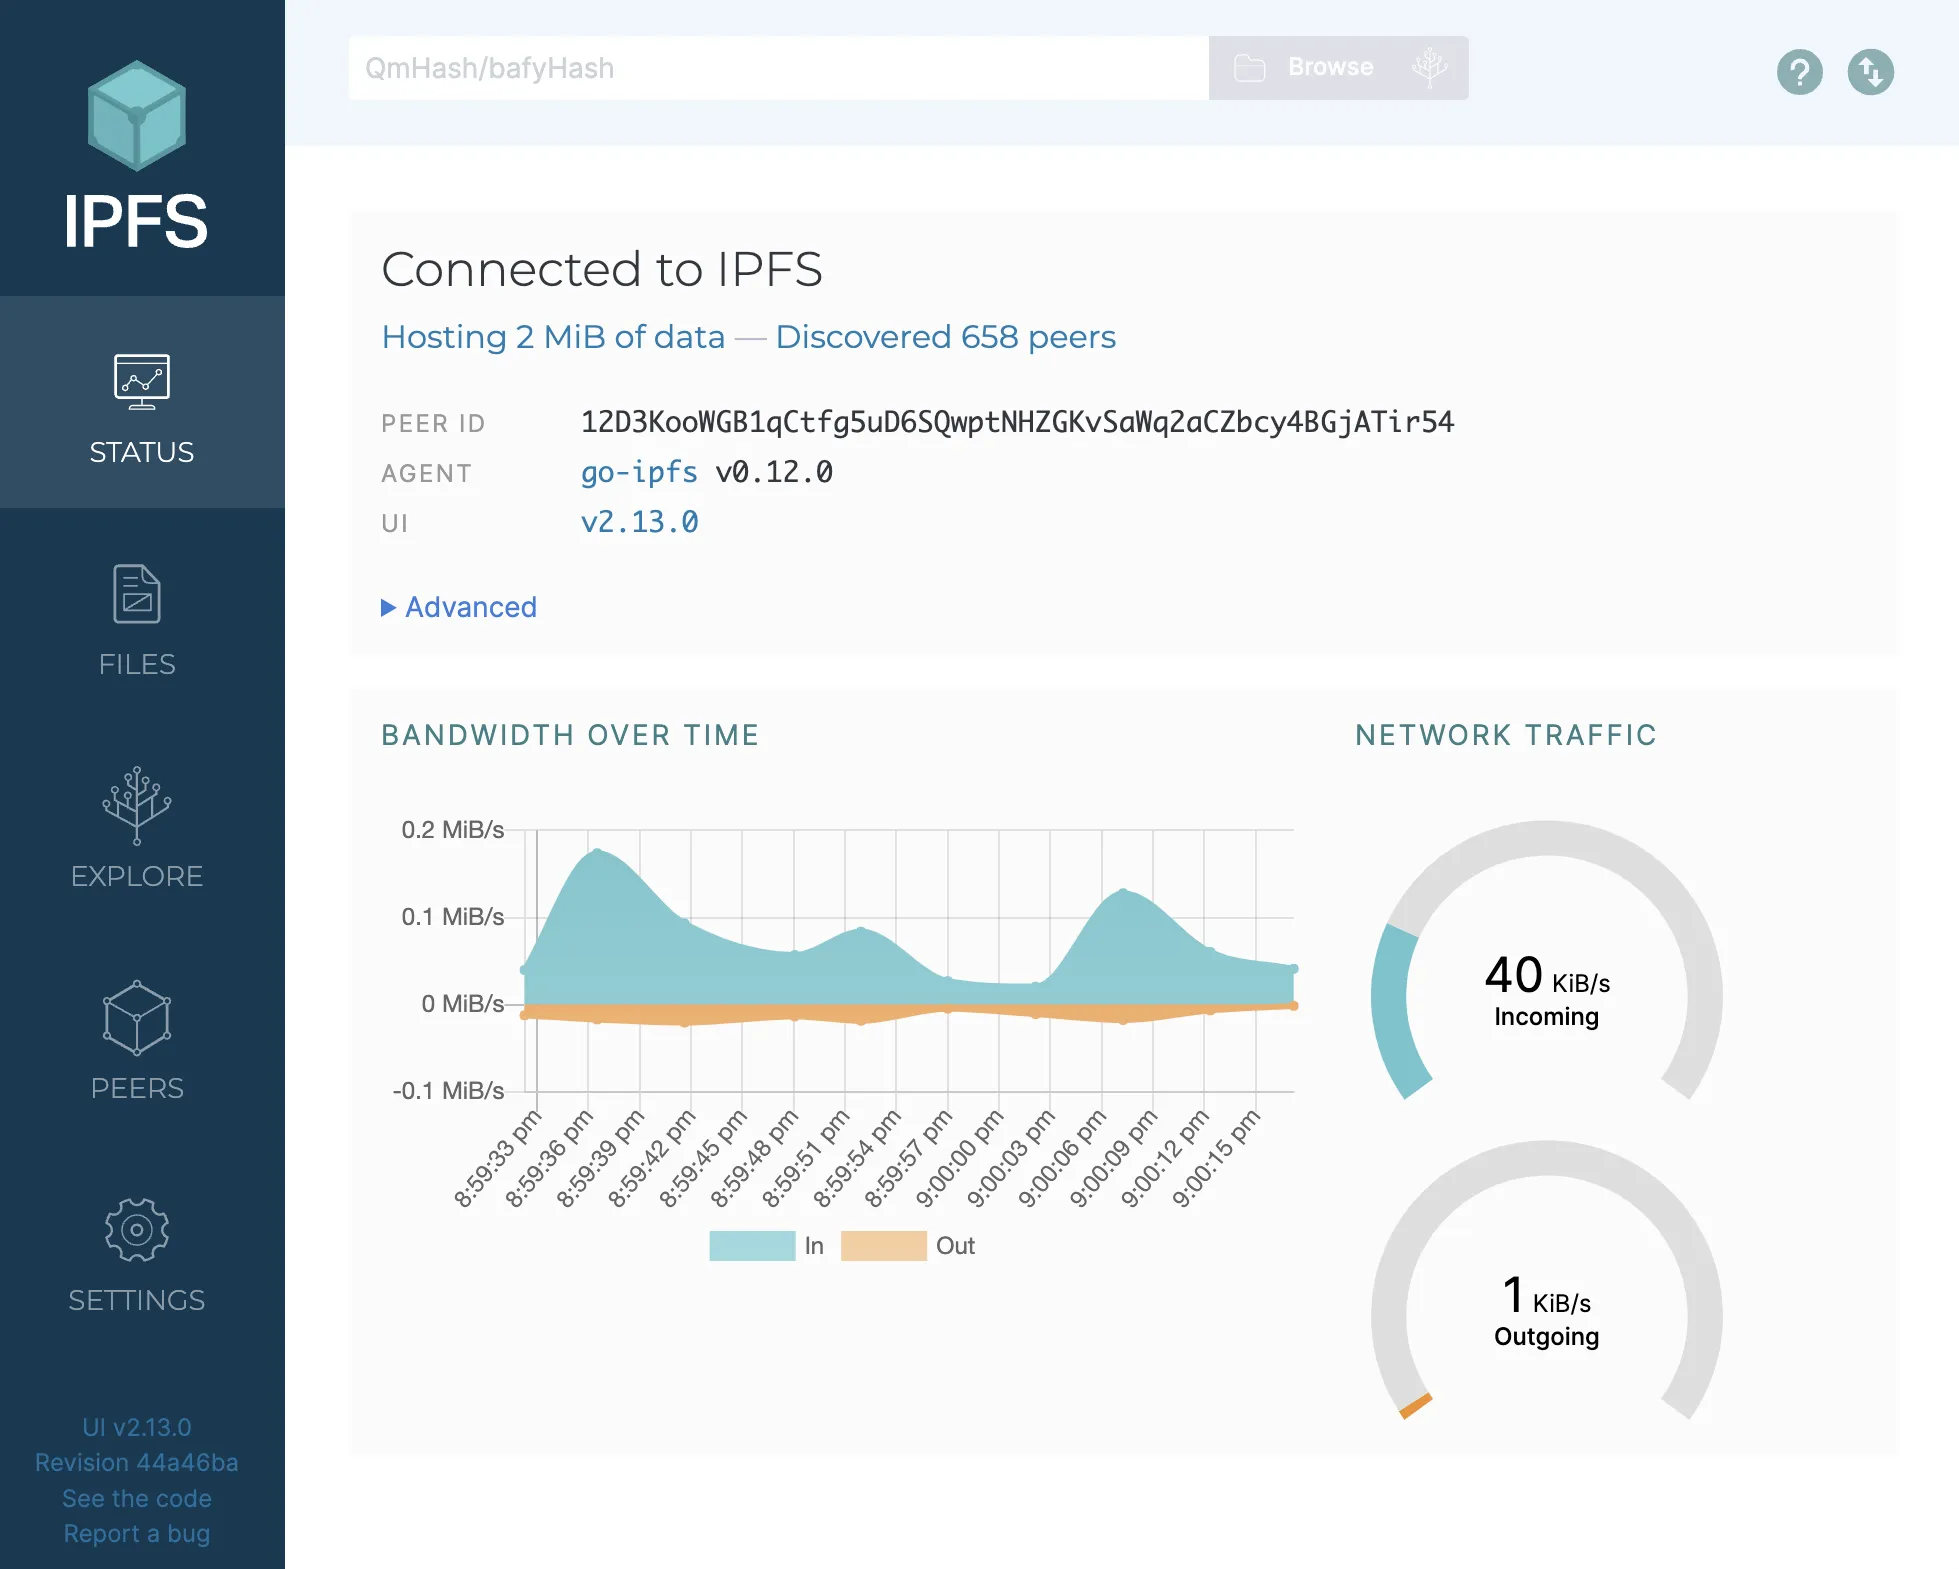
To view the content stored on your node, click the "Files" tab on the left sidebar.
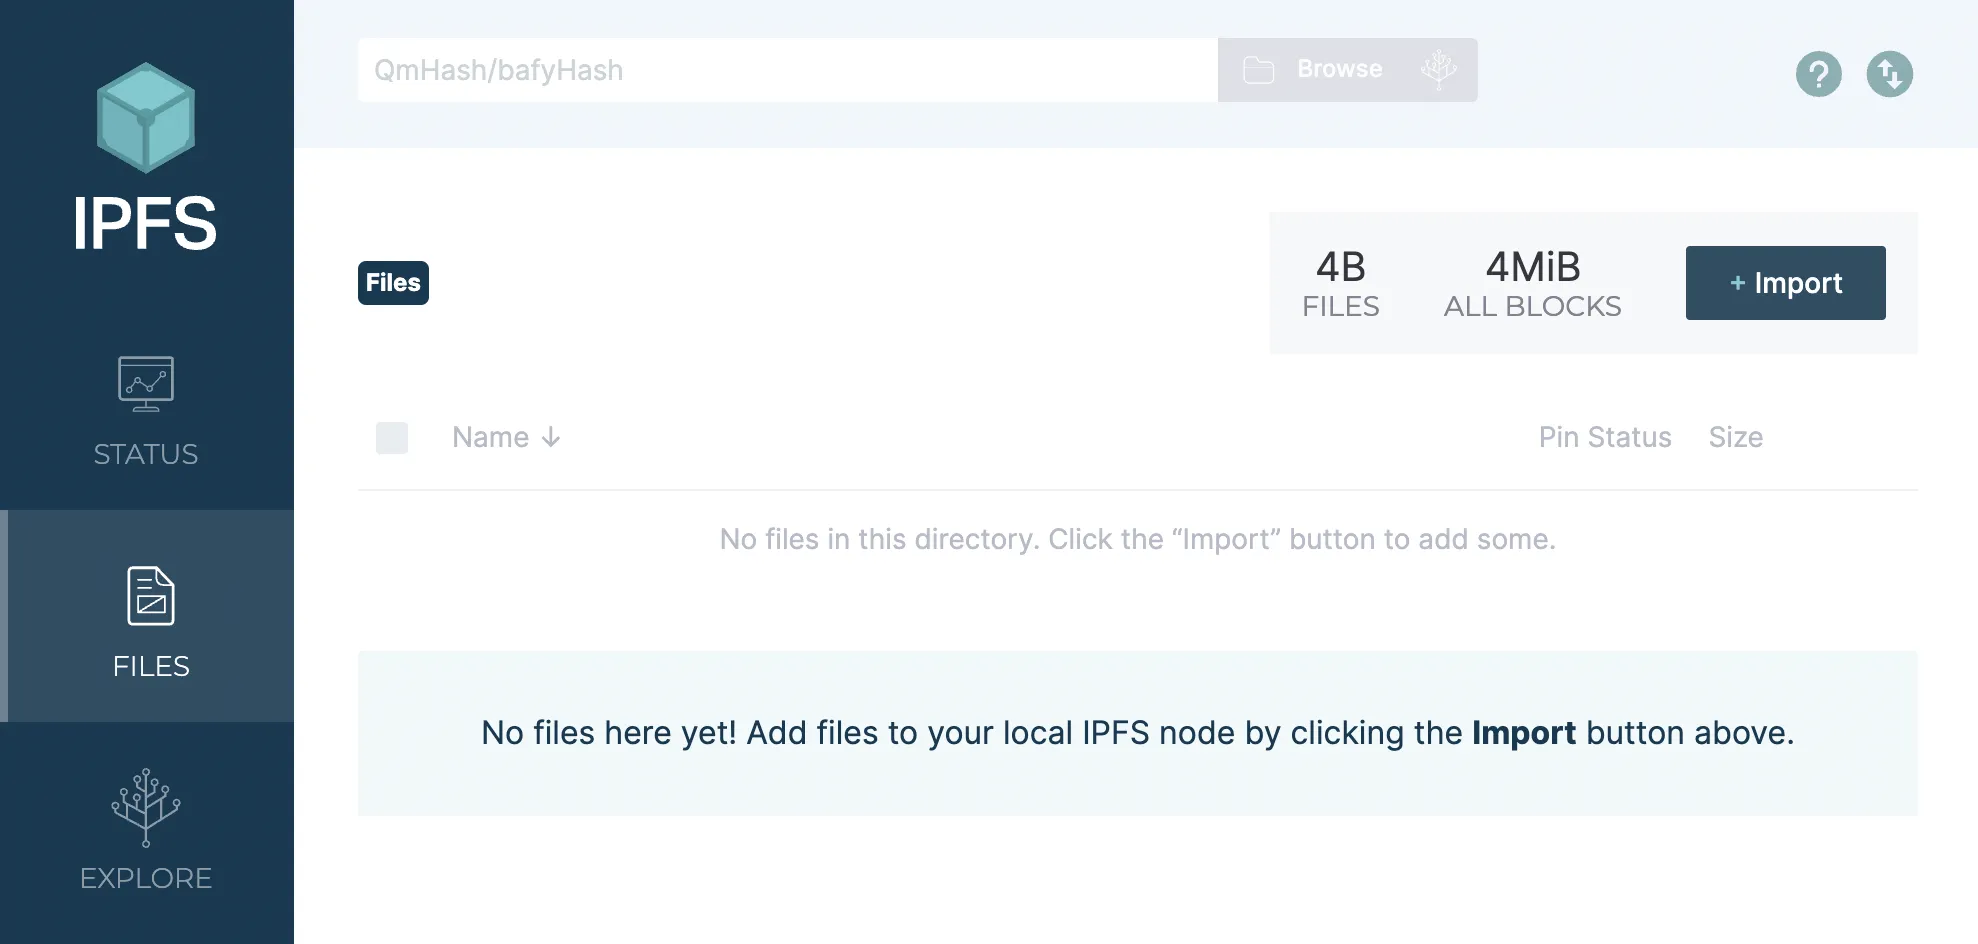
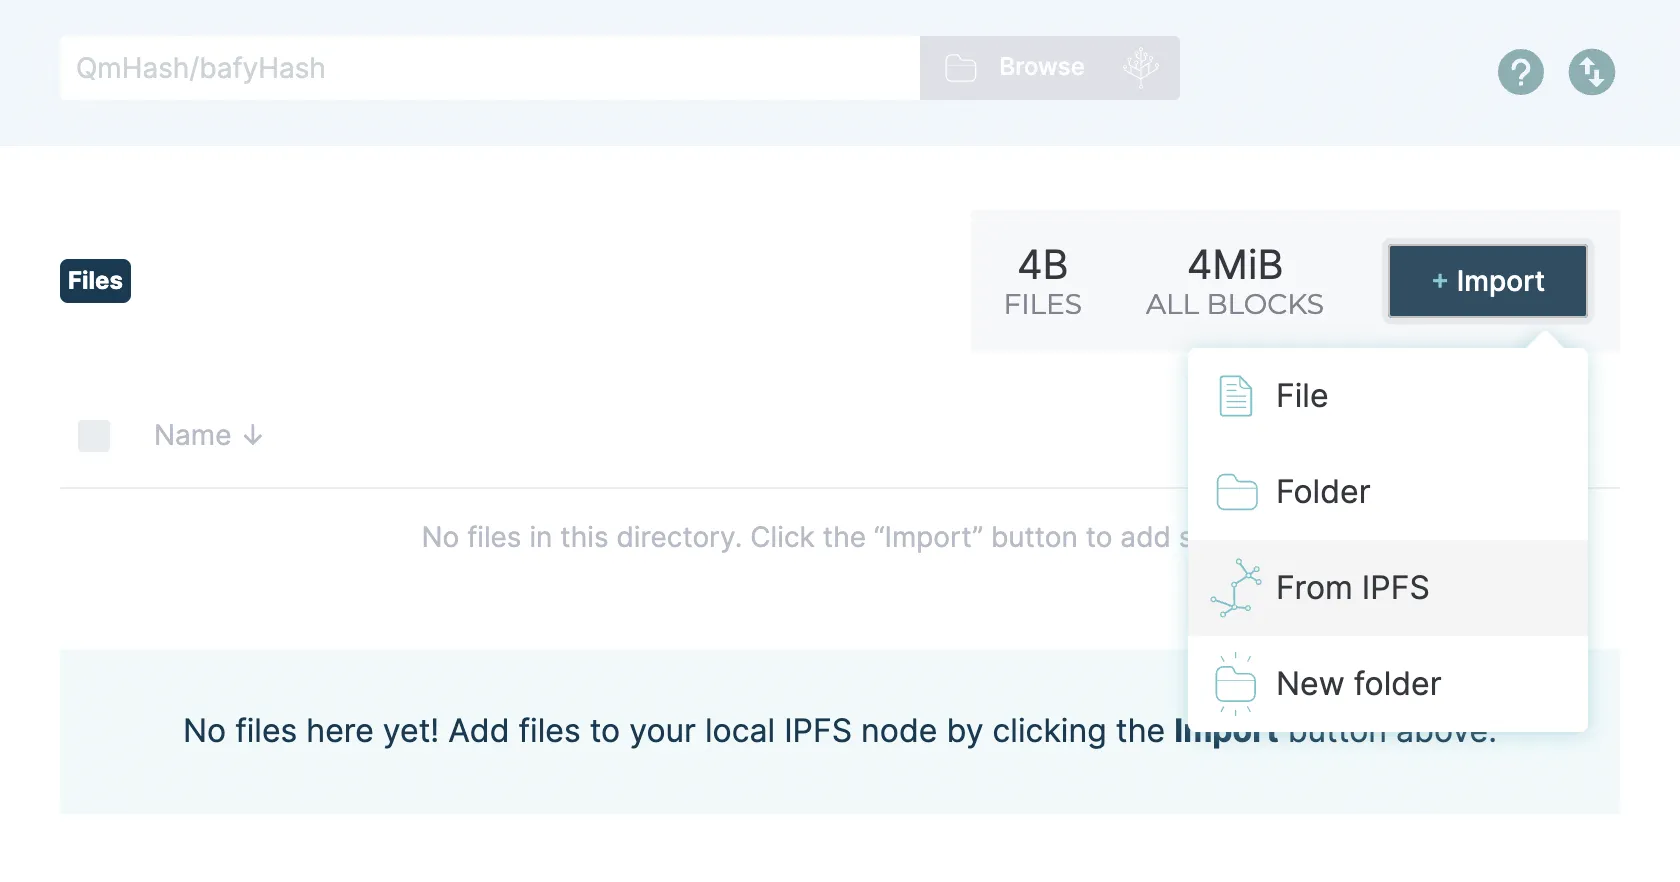
To add your new HTML files, return to the Web UI, click the import button, and select "From IPFS."
To add these files from the command line, use
ipfs files cp /ipfs/<ipfs-CID>.
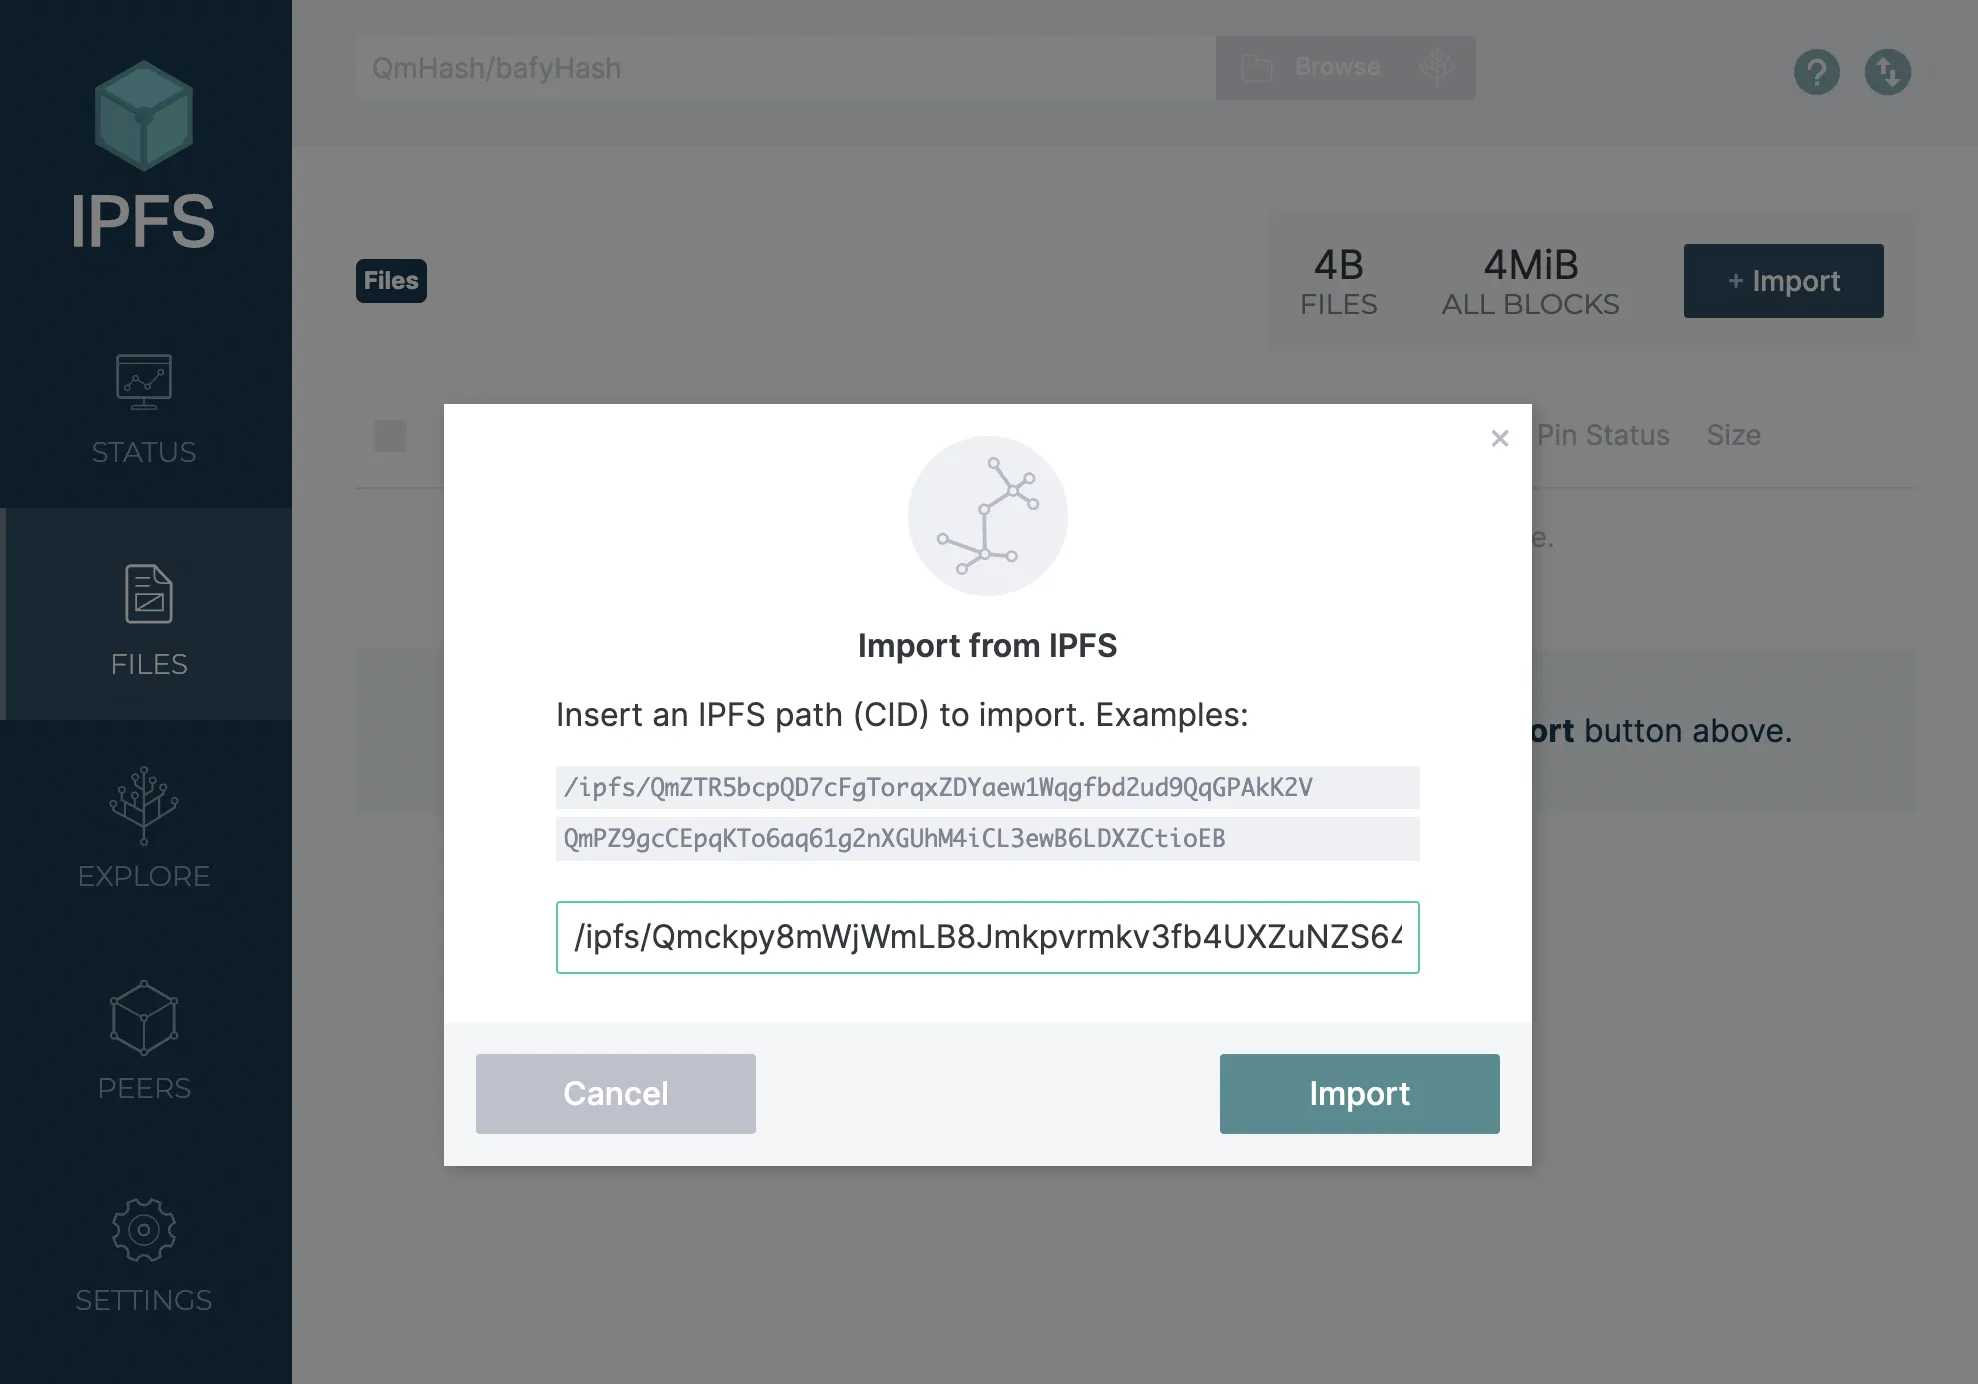
Include the IPFS path for the directory: /ipfs/Qmckpy8mWjWmLB8Jmkpvrmkv3fb4UXZuNZS648bh4fuj4M and click Import.
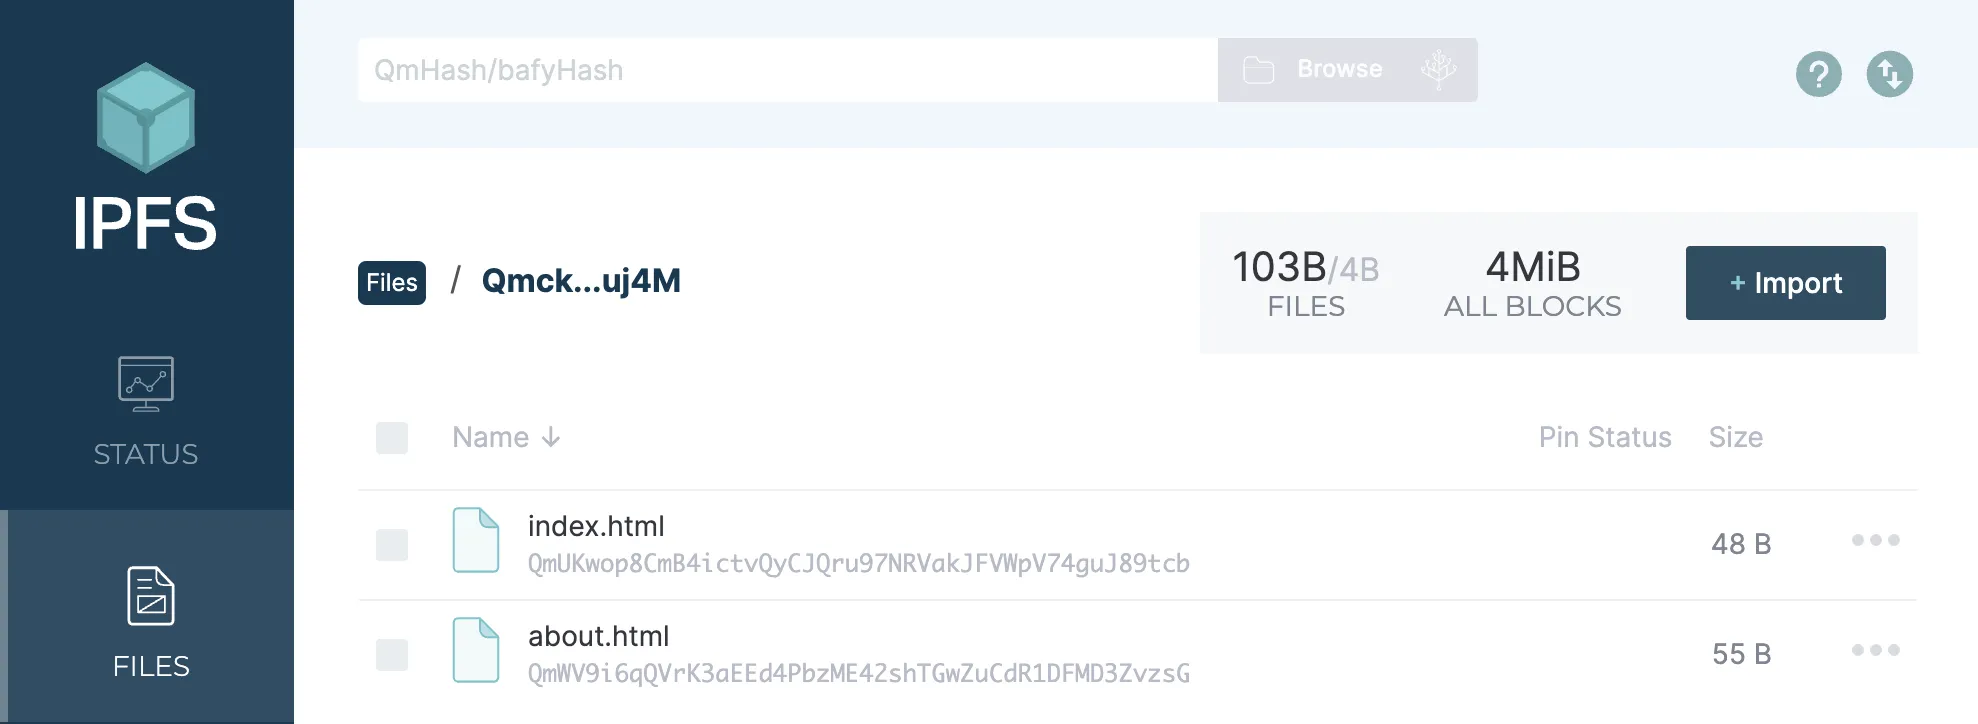
Now we can view the directory inside IPFS Desktop. Click on the directory to view the files inside.

We can see the index.html and about.html files. Click on index.html to see the specific file.
While viewing the file you can click the More button to find a shareable link for the file.
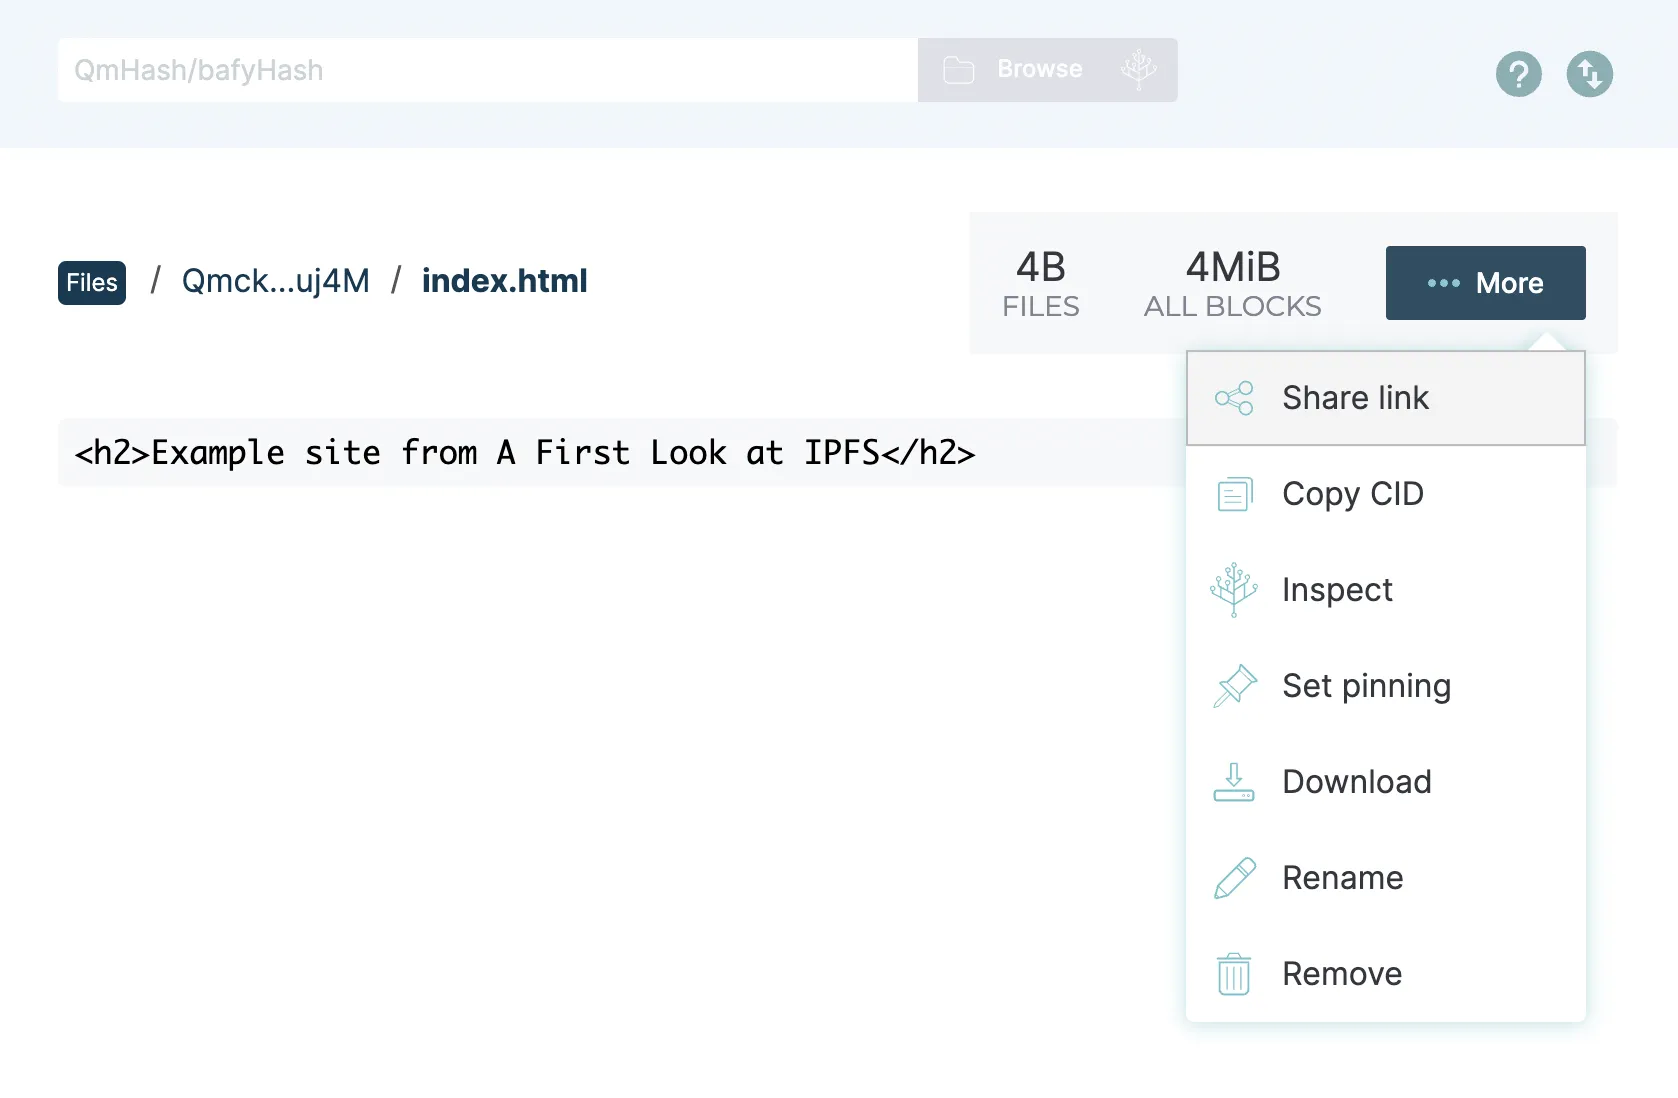
Open the link (https://ipfs.io/ipfs/QmUKwop8CmB4ictvQyCJQru97NRVakJFVWpV74guJ89tcb?filename=index.html) in a browser.

InterPlanetary Name System
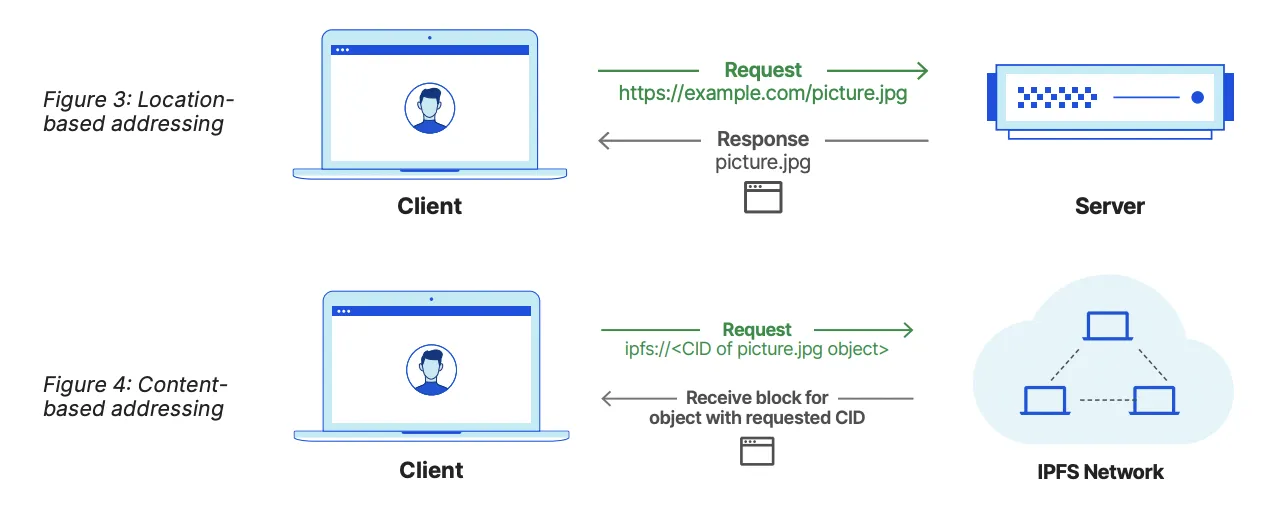
As explained previously, IPFS uses content-based addressing which creates an address of a file based on data contained within the file. But that means every change to a piece of content generates a new globally unique identifier. How would you share a piece a content with a friend? If you were to share an IPFS address with someone, you would need to give the person a new link every time you update the content.
If you make an edit to a published blog post, how can you ensure users will receive the updated version? The InterPlanetary Name System (or IPNS) creates an address that can be updated. A name in IPNS is the hash of a public key that is associated with a record. This record contains information about the hash it links to that is signed by the corresponding private key. New records can be signed and published at any time.
Example IPNS Setup with CLI
ipfs name allows publishing and resolving IPNS names with ipfs name publish and ipfs name resolve. Publish the CID for index.html to IPNS:
ipfs name publish QmUKwop8CmB4ictvQyCJQru97NRVakJFVWpV74guJ89tcb
Published to k51qzi5uqu5dijbpye96k44pqm044ugujarju7osnibd195okn1syewmgwuwdz:
/ipfs/QmUKwop8CmB4ictvQyCJQru97NRVakJFVWpV74guJ89tcb
k51... is the public key or IPNS name of the IPFS you are running. Once the content hash is set with an IPNS address it can be referenced on any IPFS gateway. This allows periodic updates to keep the content up to date without having to change the content identifier.
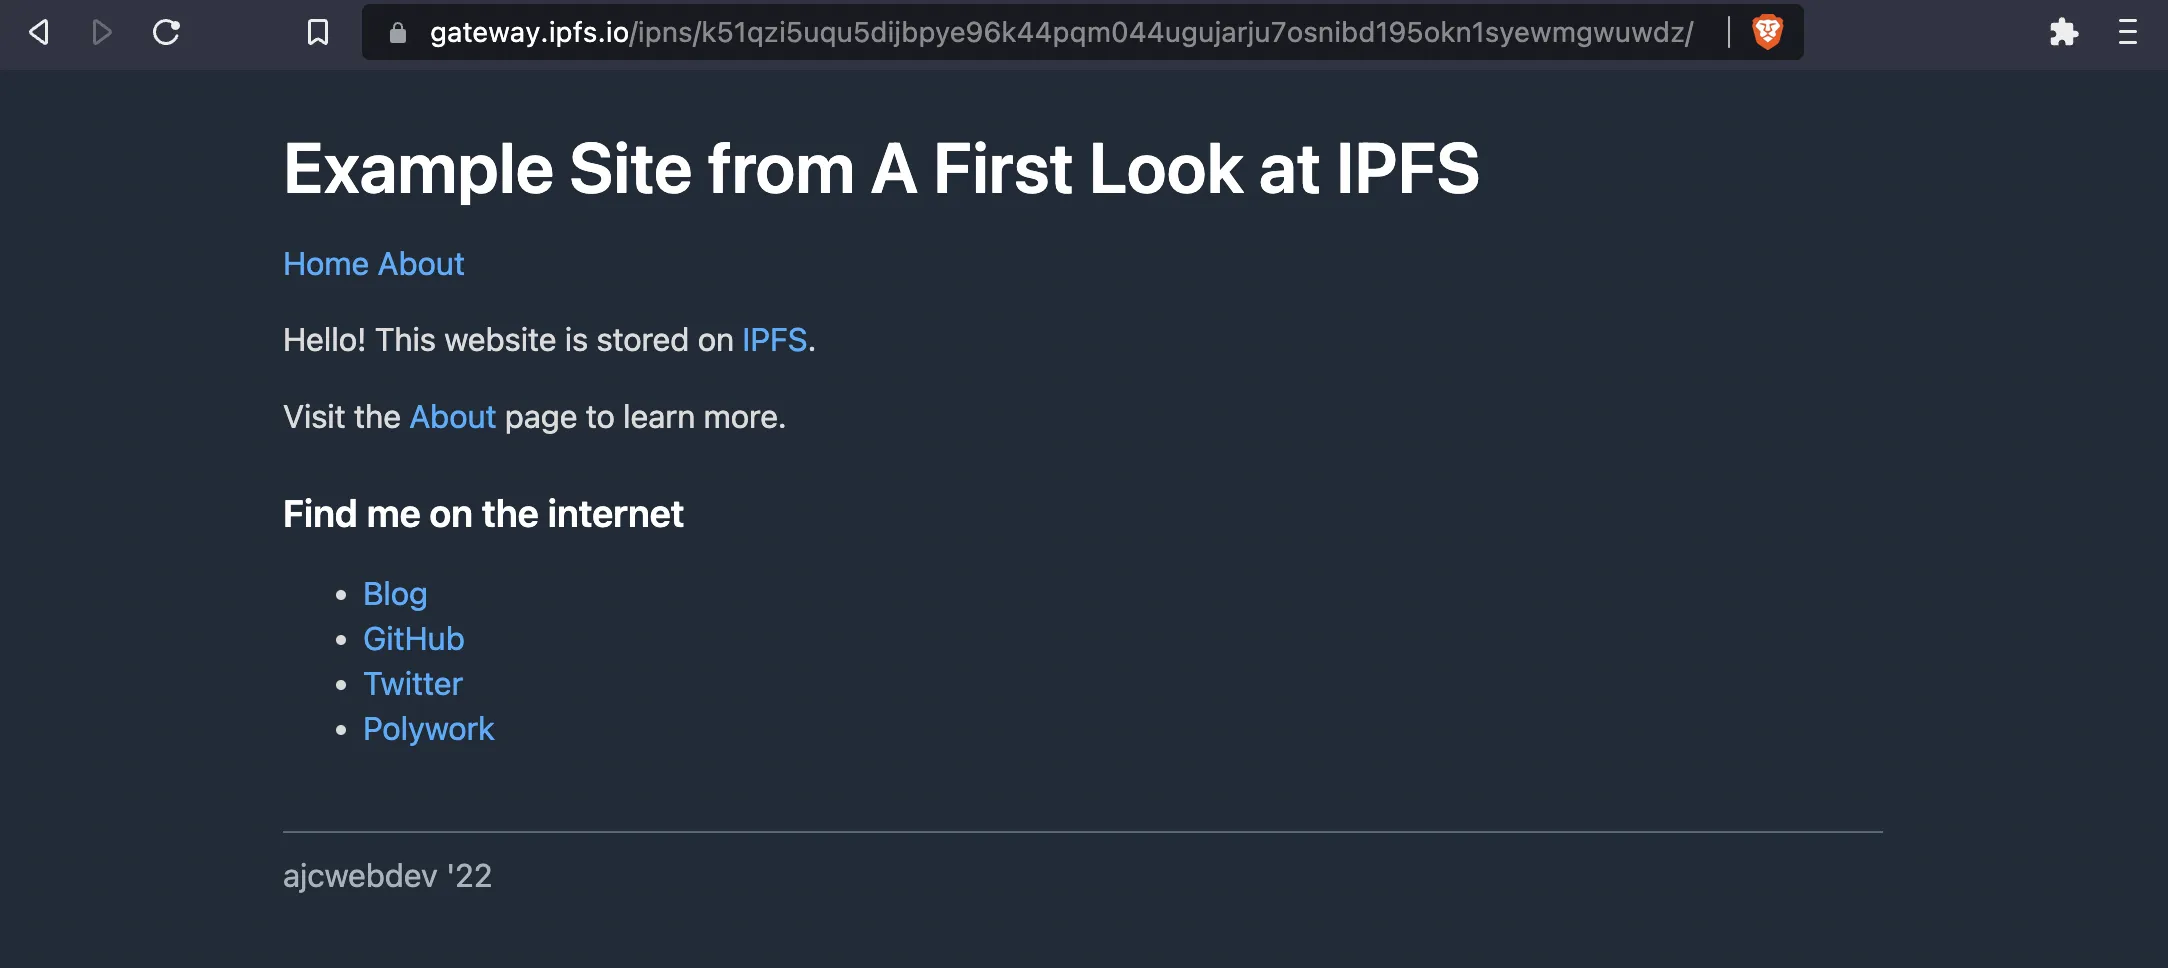
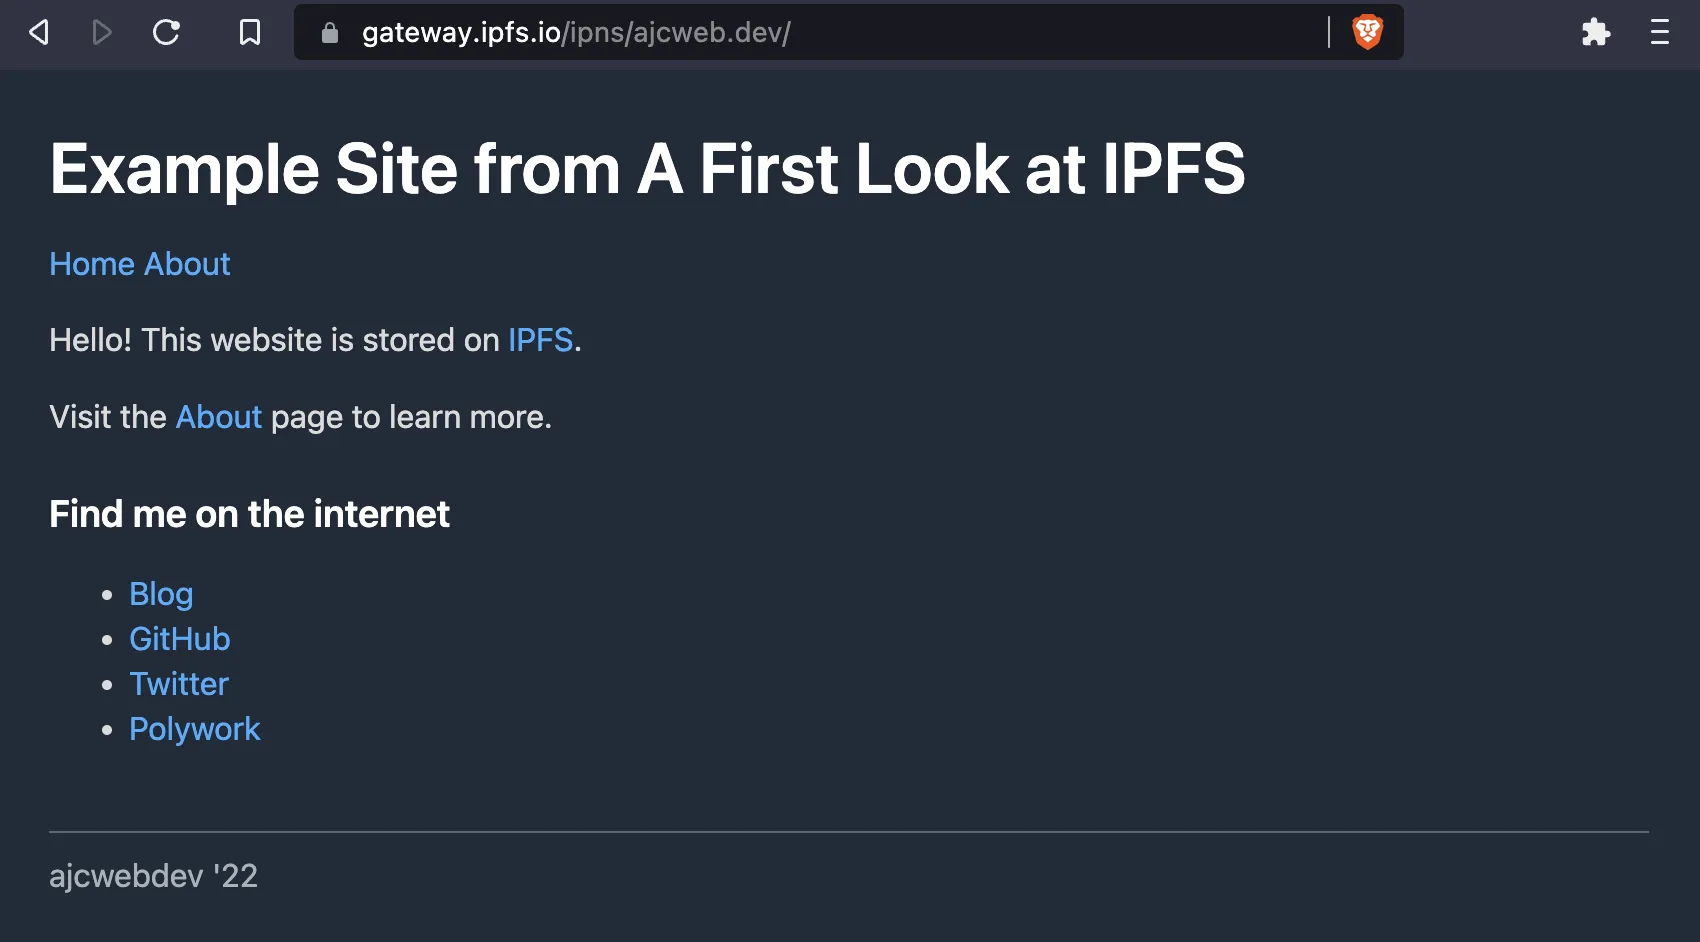
You can view your file by appending the key to https://gateway.ipfs.io/ipns/:
curl "https://gateway.ipfs.io/ipns/k51qzi5uqu5dijbpye96k44pqm044ugujarju7osnibd195okn1syewmgwuwdz/"
You can now change the file repeatedly. Even though the CID changes when you change the file, you can continue to access it with this key. Open index.html in a text editor and give it a full HTML page structure.
<!DOCTYPE html>
<html lang="en">
<head>
<meta charset="UTF-8">
<meta name="viewport" content="width=device-width, initial-scale=1.0">
<link rel="stylesheet" href="https://cdn.jsdelivr.net/npm/water.css@2/out/water.css">
<title>Example IPFS Site</title>
<meta name="description" content="A minimal HTML website hosted on IPFS.">
<meta property="og:description" content="A minimal HTML website hosted on IPFS.">
<meta property="og:type" content="website">
<meta property="og:title" content="Example IPFS Site">
<meta property="og:image" content="https://user-images.githubusercontent.com/12433465/172808308-bc230af2-b2a9-48a9-91b7-5c4df3885dae.png">
</head>
<body>
<header>
<h1>Example Site from A First Look at IPFS</h1>
<nav>
<a href="index.html">Home</a>
<a href="about.html">About</a>
</nav>
<p>Hello! This website is stored on <a href="https://docs.ipfs.tech/">IPFS</a>.</p>
<p>Visit the <a href="about.html">About</a> page to learn more.</p>
</header>
<main>
<h3>Find me on the internet</h3>
<ul>
<li><a href="https://ajcwebdev.com">Blog</a></li>
<li><a href="https://github.com/ajcwebdev">GitHub</a></li>
<li><a href="https://twitter.com/ajcwebdev">Twitter</a></li>
<li><a href="https://poly.work/ajcwebdev">Polywork</a></li>
</ul>
</main>
<footer>ajcwebdev '22</footer>
</body>
</html>
Do the same for about.html.
<!DOCTYPE html>
<html lang="en">
<head>
<meta charset="UTF-8">
<meta name="viewport" content="width=device-width, initial-scale=1.0">
<link rel="stylesheet" href="https://cdn.jsdelivr.net/npm/water.css@2/out/water.css">
<title>About This Website</title>
<meta name="description" content="A description of how this website is hosted.">
<meta property="og:description" content="A description of how this website is hosted.">
<meta property="og:type" content="website">
<meta property="og:title" content="About This Website">
<meta property="og:image" content="https://user-images.githubusercontent.com/12433465/172808308-bc230af2-b2a9-48a9-91b7-5c4df3885dae.png">
</head>
<body>
<header>
<h1>About the InterPlanetary File and Name System</h1>
<nav>
<a href="index.html">Home</a>
<a href="about.html">About</a>
</nav>
</header>
<main>
<h2>InterPlanetary File and Name System</h2>
<p>
The <a href="https://ipfs.tech/">InterPlanetary File System</a> (or IPFS) is a global, versioned,
peer-to-peer filesystem that incorporates ideas from Git, BitTorrent, and the Web. It includes a name
service called the <a href="https://docs.ipfs.tech/concepts/ipns/">InterPlanetary Name System</a> (or IPNS).
</p>
</main>
<footer>ajcwebdev '22</footer>
</body>
</html>
Add the new files to receive updated CIDs.
ipfs add -r ajcwebdev-ipfs
added QmY86Dqb7dopD9TTcuqBpoEv18e645Ry6GA6kct73Yznit ajcwebdev-ipfs/about.html
added QmV5EYYQzkRsjLk64FjStbW87BgRQF3kStYe7tDz6nCPLa ajcwebdev-ipfs/index.html
added QmZNzobASVviLbqMYQHkUyy58skC9FdSw1sGXL3dcuPqdL ajcwebdev-ipfs
Update your IPNS:
ipfs name publish QmZNzobASVviLbqMYQHkUyy58skC9FdSw1sGXL3dcuPqdL
Published to k51qzi5uqu5dijbpye96k44pqm044ugujarju7osnibd195okn1syewmgwuwdz:
/ipfs/QmZNzobASVviLbqMYQHkUyy58skC9FdSw1sGXL3dcuPqdL
You can now go back to view your updated file using the same address:
You can view the CID of the file associated with your key by using name resolve:
ipfs name resolve
/ipfs/QmZNzobASVviLbqMYQHkUyy58skC9FdSw1sGXL3dcuPqdL
IPFS Gateways
To view any pinned files in your browser as we've been doing throughout this tutorial, you need to use an IPFS gateway. This can be done by entering a gateway URL such as https://ipfs.io/ipfs/ and then including either:
- The hash of the file -
QmUKwop8CmB4ictvQyCJQru97NRVakJFVWpV74guJ89tcb - The hash of the directory containing the file followed by the path to the resource -
Qmckpy8mWjWmLB8Jmkpvrmkv3fb4UXZuNZS648bh4fuj4M/index.html
Browsers like Brave already support IPFS out of the box and can redirect requests to your local IPFS node. However, most browsers will need to fetch the resource from an IPFS gateway. Gateways are necessary for bridging the gap between systems that speak HTTP but not distributed protocols like IPFS. There are three different resolution styles for IPFS gateways.
Path
The simplest method of resolution is using a URL path for content addressing as a resource name without a canonical location. The HTTP server provides the location part and browsers can interpret an IPFS content path as relative to the current server without needing any conversion. Examples include:
ipfs.io/ipfs/<CID>/<path-to-resource>gateway.ipfs.io/ipfs/<CID>/<path-to-resource>ipfs.fleek.co/ipfs/<CID>/<path-to-resource>cloudflare-ipfs.com/ipfs/<CID>/<path-to-resource>
The problem with this approach is all pages share a single origin which violates the same-origin policy.
Subdomain
Path resolution should only be used when site isolation does not matter such as static content without cookies, local storage, or permissioned Web APIs. In contrast, subdomain resolution maintains compliance with the same-origin policy. The browser will interpret each returned file as being from a different origin determined by the CID. Examples include:
<CID>.ipfs.dweb.link/<path-to-resource><CID>.ipfs.nftstorage.link/<path-to-resource><CID>.ipfs.cf-ipfs.com/<path-to-resource>
In both of the previous resolution strategies, the resources are served based on a CID. However, we already know that we actually want to use an IPNS address so we can update our content if need. You also may be wondering how to actually give your website a domain name. Without a domain name you would need to keep sharing these long, ridiculous CID or IPNS names.
DNSLink
If we want to always serve the latest version of the data to a user with a memorable name then a version-independent identifier must resolve with DNS into the current version's IPFS CID. Gateways can employ IPNS to resolve the IPNS identifier.
The IPNS identifier will resolve into the current version's CID and then fetch the corresponding content. The gateway provided by the IPFS daemon understands the Host header present in HTTP requests and will check if DNSLink exists for a specified domain name. If DNSLink is present, the gateway will return content from a path resolved via a DNS TXT record.
Link Cloudflare DNS to DNSLink
I have a domain currently managed on Cloudflare and registered on Namecheap where I have Cloudflare's Nameservers connected to Custom DNS. I will include a TXT record with the name _dnslink and the content dnslink=/ipns/k51qzi5uqu5dijbpye96k44pqm044ugujarju7osnibd195okn1syewmgwuwdz
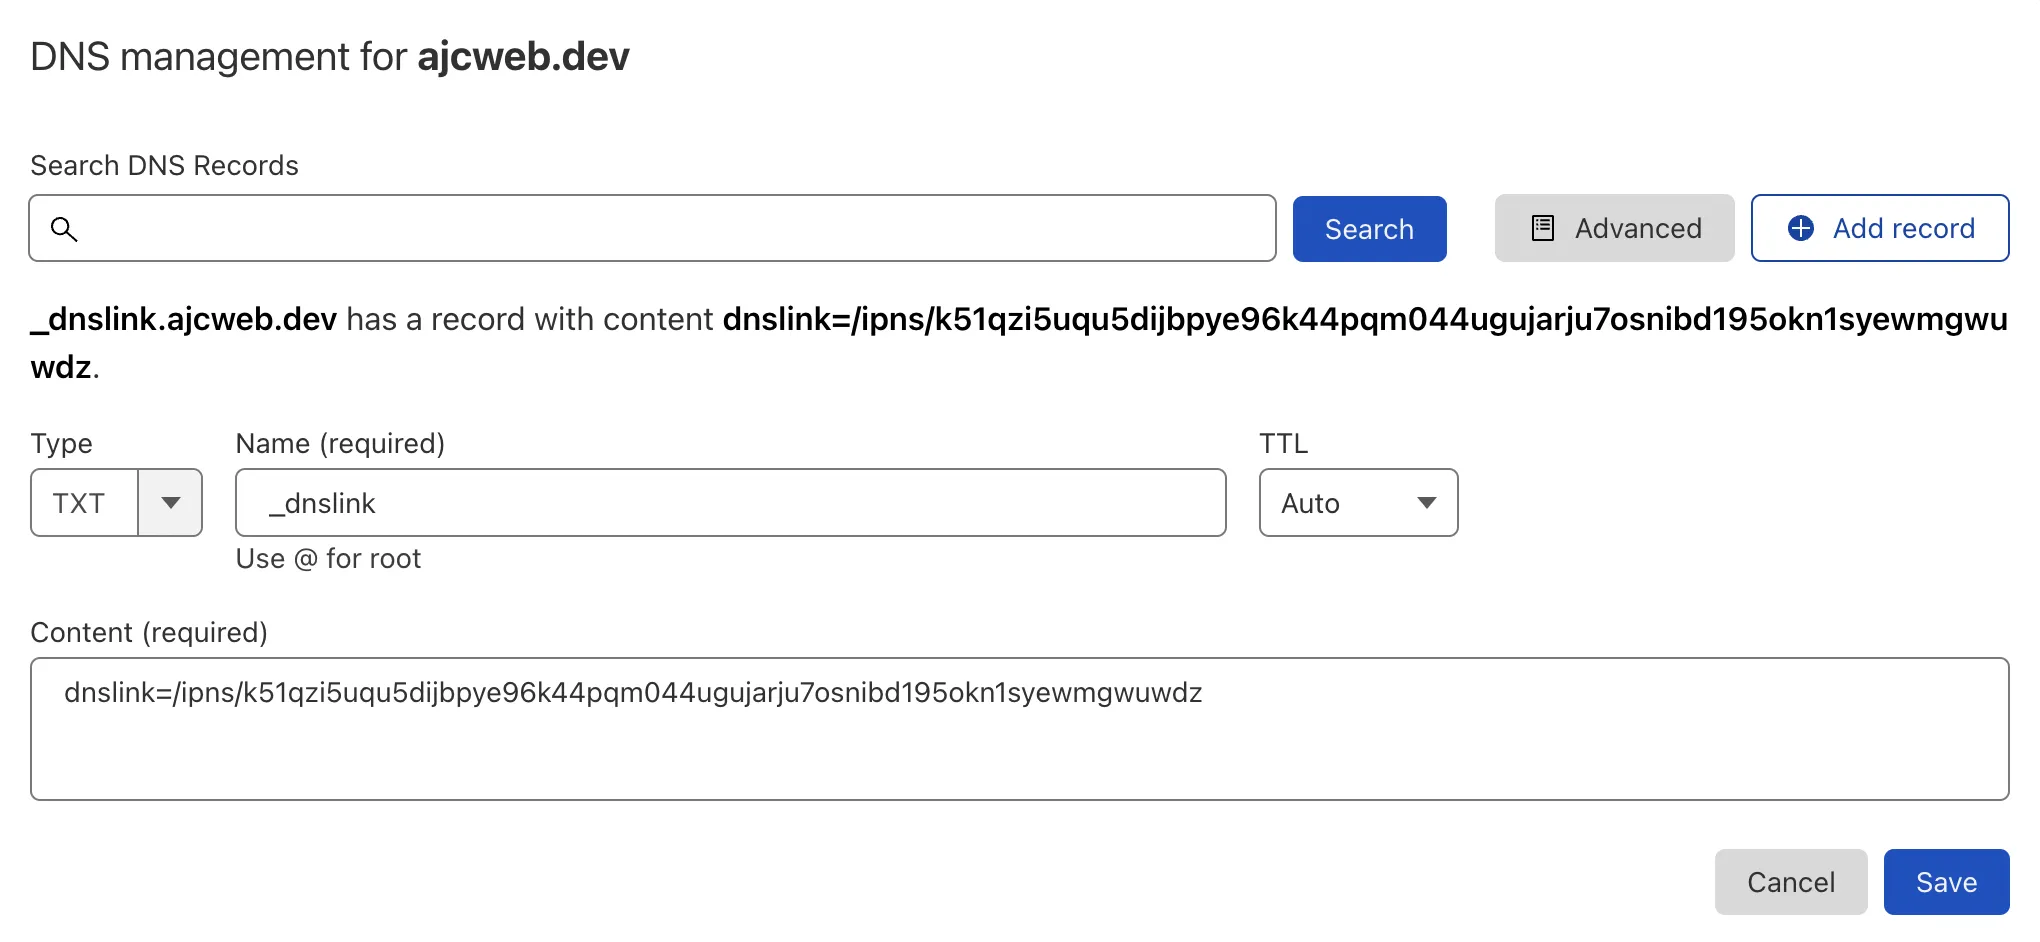
Test the DNS record with dig.
dig +short TXT _dnslink.ajcweb.dev
"dnslink=/ipns/k51qzi5uqu5dijbpye96k44pqm044ugujarju7osnibd195okn1syewmgwuwdz"
List the files contained in the directory with ipfs ls /ipns/<YOUR_DOMAIN>:
ipfs ls /ipns/ajcweb.dev
QmY86Dqb7dopD9TTcuqBpoEv18e645Ry6GA6kct73Yznit 1401 about.html
QmV5EYYQzkRsjLk64FjStbW87BgRQF3kStYe7tDz6nCPLa 1470 index.html
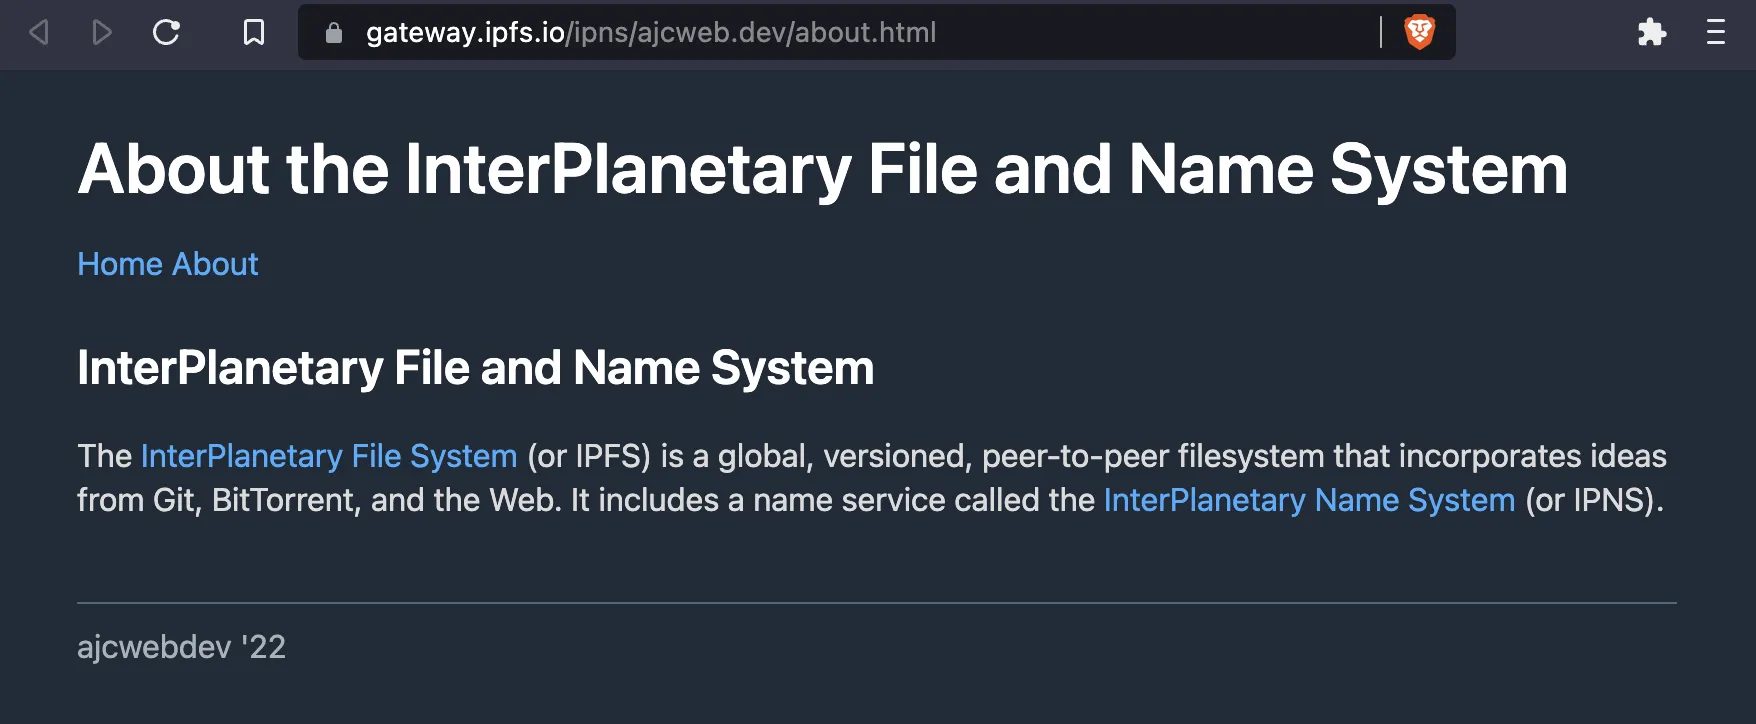
Open ipfs.io/ipns/ajcweb.dev to view the website.
Click the about link to ensure both pages are uploaded.
Reflections
As of right now, compared to almost every other popular web hosting provider on the market, IPFS is absolutely the most ridiculously complicated and unreliable way you could ever host a static site. It gets periodically garbage collected which means your website may just randomly disappear if you didn't pin it right. It's also super flaky and works differently in different browsers.
Despite these shortcomings, somehow it still feels like the future. But how can something complicated and unreliable be the future? IPFS is a core piece of web3 technology but despite being wrapped up in the web3 movement it manages to sidestep some of the most prevalent critiques. For example, IPFS does not require proof of work to function or money for entry (although systems like Filecoin do).
This means the two biggest web3 criticisms don't really apply. Its peer-to-peer architecture also evokes popular torrenting sites from the early 2000s. This resonates with individuals like me who have used BitTorrent extensively. It's also familiar to anyone who has used Git before. But for me, the most exciting part is I was able to get something online with just the following steps:
- Install a CLI tool or use the desktop/web based UI to get started.
- Run a command to generate a boilerplate "repo" that can accept arbitrary HTML.
- Run another command to put a static HTML file onto the network and get a URL back.
Today, figuring out those three steps requires a significant amount of research plus trial and error. But it's possible to imagine a future where all of that start up time can be ironed out. New blockchain based naming systems like ENS, HNS, and Unstoppable Domains are attempting to address issues related to DNS interoperability.
This is not a piece of technology that you want to put in production today. But it points towards a different future that fascinates and entices me. Hopefully this blog post gives you a taste of that same future.