A First Look at AWS SAM
Published:
AWS Serverless Application Model (SAM) is an open-source framework for building serverless applications with a shorthand syntax for common cloud resources.
Outline
- Comparison to CDK
- Setup
- Initialize Project
- Project Structure
- Deploy to AWS
- Discover Related Articles
All of this project’s code can be found in the First Look monorepo on my GitHub.
Introduction
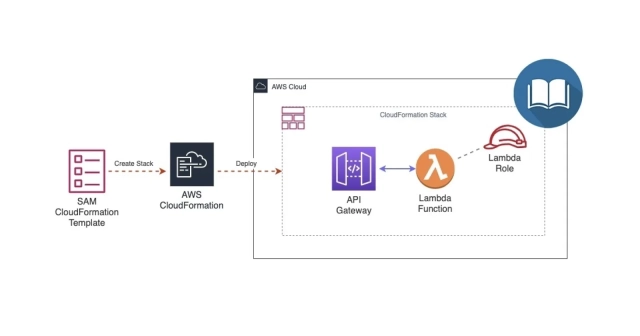
AWS Serverless Application Model (SAM) is an open-source framework for building serverless applications. It provides shorthand syntax to express functions, APIs, databases, and event source mappings. Much like AWS CDK, SAM transforms and expands its own syntax into CloudFormation syntax during deployment.
Comparison to CDK
- SAM uses a declarative, template-based syntax with JSON or YAML similar to CloudFormation but syntactically simpler
- CDK uses common languages such as JavaScript, TypeScript, or Python to imperatively provision resources similar to Pulumi
SAM CLI is currently used to build locally, test, and package serverless applications defined using AWS CloudFormation or SAM templates. However, there is currently early support for using the SAM CLI to build and test with the CDK.
Setup
Configure AWS CLI
Make sure you have the AWS CLI installed and an AWS account. For general use, aws configure is recommended as the fastest way to set up your AWS CLI installation.
aws configureWhen you enter this command, the AWS CLI prompts you for four pieces of information:
- Access key ID
- Secret access key
- AWS Region
- Output format
Go to My Security Credentials to find your Access Key ID, Secret Access Key, and default region. You can leave the output format blank.
AWS Access Key ID: <YOUR_ACCESS_KEY_ID>AWS Secret Access Key: <YOUR_SECRET_ACCESS_KEY>Default region name: <YOUR_REGION_NAME>Default output format [None]:Install SAM CLI
There are numerous ways to install the SAM CLI depending on your development environment and operating system. I followed the instructions for installing with Homebrew.
brew tap aws/tapbrew install aws-sam-cliCheck sam version.
sam --versionOutput:
SAM CLI, version 1.23.0Initialize Project
sam initOutput:
SAM CLI now collects telemetry to better understand customer needs.You can OPT OUT and disable telemetry collection by settingthe environment variable SAM_CLI_TELEMETRY=0 in your shell.
Thanks for your help!Learn More:https://docs.aws.amazon.com/serverless-application-model/latest/developerguide/serverless-sam-telemetry.html
Select a Template
Which template source would you like to use? 1 - AWS Quick Start Templates 2 - Custom Template LocationSelect AWS Quick Start Templates.
Select Package Type
What package type would you like to use? 1 - Zip (artifact is a zip uploaded to S3) 2 - Image (artifact is an image uploaded to an ECR image repository)Select Zip.
Select Language Runtime
Which runtime would you like to use? 1 - nodejs14.x 2 - python3.8 3 - ruby2.7 4 - go1.x 5 - java11 6 - dotnetcore3.1 7 - nodejs12.x 8 - nodejs10.x 9 - python3.7 10 - python3.6 11 - python2.7 12 - ruby2.5 13 - java8.al2 14 - java8 15 - dotnetcore2.1Select nodejs14.x.
Select Project Name
Project name [sam-app]: ajcwebdev-samGive your project a name. I named my project ajcwebdev-sam.
Select Example Application
Cloning app templates from https://github.com/aws/aws-sam-cli-app-templates
AWS quick start application templates:  1 - Hello World Example  2 - Step Functions Sample App (Stock Trader)  3 - Quick Start: From Scratch  4 - Quick Start: Scheduled Events  5 - Quick Start: S3  6 - Quick Start: SNS  7 - Quick Start: SQS  8 - Quick Start: Web Backend
Select Hello World Example.
Output:
-----------------------Generating application:-----------------------Name: ajcwebdev-samRuntime: nodejs14.xDependency Manager: npmApplication Template: hello-worldOutput Directory: .
Next steps can be found in the README file at ./ajcwebdev-sam/README.md
Project Structure
├── .gitignore├── README.md├── template.yaml├── events│ └── event.json└── hello_world ├── .npmignore ├── app.js ├── package.json └── tests └── unit └── test_handler.jsSAM Template
This example app uses a single Lambda function along with API Gateway.
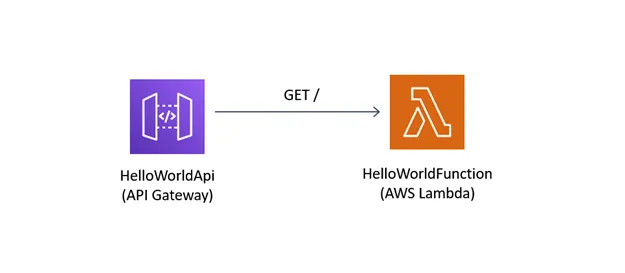
These are defined in template.yaml which includes a SAM template for specifying your application’s AWS resources.
AWSTemplateFormatVersion: '2010-09-09'Transform: AWS::Serverless-2016-10-31Description: >  ajcwebdev-sam
  Sample SAM Template for ajcwebdev-sam
Globals:  Function:    Timeout: 3
Resources:  HelloWorldFunction:    Type: AWS::Serverless::Function    Properties:      CodeUri: hello-world/      Handler: app.lambdaHandler      Runtime: nodejs14.x      Events:        HelloWorld:          Type: Api          Properties:            Path: /hello            Method: get
Outputs:  HelloWorldApi:    Description: "API Gateway endpoint URL for Prod stage for Hello World function"    Value: !Sub "https://${ServerlessRestApi}.execute-api.${AWS::Region}.amazonaws.com/Prod/hello/"  HelloWorldFunction:    Description: "Hello World Lambda Function ARN"    Value: !GetAtt HelloWorldFunction.Arn  HelloWorldFunctionIamRole:    Description: "Implicit IAM Role created for Hello World function"    Value: !GetAtt HelloWorldFunctionRole.Arn
App Entry Point
The hello-world directory contains code for the application’s Lambda function inside app.js and a package.json file for the necessary dependencies and scripts needed for our build process.
let response
/** * * @param {Object} event - API Gateway Lambda Proxy Input Format * @param {Object} context * @returns {Object} object - API Gateway Lambda Proxy Output Format * */exports.lambdaHandler = async (event, context) => {  try {    response = {      'statusCode': 200,      'body': JSON.stringify({        message: 'hello world',      })    }  } catch (err) {    console.log(err)    return err  }  return response}
You specify dependencies in a manifest file that you include in your application. Since our example is using Node.js functions, our manifest file is package.json. This file is required for sam build.
{ "name": "hello_world", "version": "1.0.0", "description": "hello world sample for NodeJS", "main": "app.js", "repository": "https://github.com/awslabs/aws-sam-cli/tree/develop/samcli/local/init/templates/cookiecutter-aws-sam-hello-nodejs", "author": "SAM CLI", "license": "MIT", "dependencies": { "axios": "^0.21.1" }, "scripts": { "test": "mocha tests/unit/" }, "devDependencies": { "chai": "^4.2.0", "mocha": "^8.2.1" }}Test Handler
The hello-world directory also contains a tests directory with a unit directory for unit tests and a test-handler.js file.
'use strict'
const app = require('../../app.js')const chai = require('chai')const expect = chai.expectvar event, context
describe('Tests index', function () {  it('verifies successful response', async () => {    const result = await app.lambdaHandler(event, context)
    expect(result).to.be.an('object')    expect(result.statusCode).to.equal(200)    expect(result.body).to.be.an('string')
    let response = JSON.parse(result.body)
    expect(response).to.be.an('object')    expect(response.message).to.be.equal("hello world")  })})
Events
The events directory contains invocation events. There are a lot of events in event.json, so we’ll take a look at each key and its corresponding value.
{ "body": "{\"message\": \"hello world\"}", "resource": "/{proxy+}", "path": "/path/to/resource", "httpMethod": "POST", "isBase64Encoded": false, "queryStringParameters": { "foo": "bar" }, "pathParameters": { "proxy": "/path/to/resource" }, "stageVariables": { "baz": "qux" }, "headers": {...}, "requestContext": {...}}| Event | Definition |
|---|---|
body | HTTP body containing data associated with the request (like content of an HTML form), or the document associated with a response. |
resource | Sets a proxy in front of the resource. |
path | Sets a path for the proxy to send the request. |
httpMethod | The HTTP POST method sends data to the server. The type of the body of the request is indicated by the Content-Type header. |
isBase64Encoded | Base encoding |
queryStringParameters | Query string parameters |
pathParameters | Proxies the request to our resources. |
stageVariables | Variables for staging |
headers includes a bunch of headers. I definitely know what all of these do. Totally.
{ ... "headers": { "Accept": "text/html,application/xhtml+xml,application/xml;q=0.9,image/webp,*/*;q=0.8", "Accept-Encoding": "gzip, deflate, sdch", "Accept-Language": "en-US,en;q=0.8", "Cache-Control": "max-age=0", "CloudFront-Forwarded-Proto": "https", "CloudFront-Is-Desktop-Viewer": "true", "CloudFront-Is-Mobile-Viewer": "false", "CloudFront-Is-SmartTV-Viewer": "false", "CloudFront-Is-Tablet-Viewer": "false", "CloudFront-Viewer-Country": "US", "Host": "1234567890.execute-api.us-east-1.amazonaws.com", "Upgrade-Insecure-Requests": "1", "User-Agent": "Custom User Agent String", "Via": "1.1 08f323deadbeefa7af34d5feb414ce27.cloudfront.net (CloudFront)", "X-Amz-Cf-Id": "cDehVQoZnx43VYQb9j2-nvCh-9z396Uhbp027Y2JvkCPNLmGJHqlaA==", "X-Forwarded-For": "127.0.0.1, 127.0.0.2", "X-Forwarded-Port": "443", "X-Forwarded-Proto": "https" }, "requestContext": {...}}The requestContext object is a map of key-value pairs. In each pair, the key is the name of a $context variable property, and the value is the value of that property.
{ ... "headers": {...}, "requestContext": { "accountId": "123456789012", "resourceId": "123456", "stage": "prod", "requestId": "c6af9ac6-7b61-11e6-9a41-93e8deadbeef", "requestTime": "09/Apr/2015:12:34:56 +0000", "requestTimeEpoch": 1428582896000, "identity": { "cognitoIdentityPoolId": null, "accountId": null, "cognitoIdentityId": null, "caller": null, "accessKey": null, "sourceIp": "127.0.0.1", "cognitoAuthenticationType": null, "cognitoAuthenticationProvider": null, "userArn": null, "userAgent": "Custom User Agent String", "user": null }, "path": "/prod/path/to/resource", "resourcePath": "/{proxy+}", "httpMethod": "POST", "apiId": "1234567890", "protocol": "HTTP/1.1" }}Deploy to AWS
Build Application
The sam build command will build your serverless application and prepare it for subsequent steps in your workflow, like locally testing the application or deploying it to AWS.
sam buildOutput:
Building
codeuri: /Users/ajcwebdev/projects/ajcwebdev-sam/hello-worldruntime: nodejs14.xmetadata: {}functions: ['HelloWorldFunction']
Running NodejsNpmBuilder:NpmPackRunning NodejsNpmBuilder:CopyNpmrcRunning NodejsNpmBuilder:CopySourceRunning NodejsNpmBuilder:NpmInstallRunning NodejsNpmBuilder:CleanUpNpmrc
Build Succeeded
Built Artifacts  : .aws-sam/buildBuilt Template   : .aws-sam/build/template.yaml
Commands you can use next=========================[*] Invoke Function: sam local invoke[*] Deploy: sam deploy --guided
This command builds any dependencies that your application has, and copies your application source code to folders under .aws-sam/build to be zipped and uploaded to Lambda.
Configure SAM Deploy
sam deploy --guidedLooking for config file [samconfig.toml] : Not found
Setting default arguments for 'sam deploy'
Stack Name [sam-app]: ajcwebdev-samAWS Region [us-west-1]: us-west-1Confirm changes before deploy [y/N]: NAllow SAM CLI IAM role creation [Y/n]: YFor the question, “HelloWorldFunction may not have authorization defined,” AWS SAM is informing you that the sample application configures an API Gateway API without authorization. When you deploy the sample application, AWS SAM creates a publicly available URL.
HelloWorldFunction may not have authorization definedIs this okay? [y/N]: YSave arguments to configuration file [Y/n]: YSAM configuration file [samconfig.toml]: samconfig.tomlSAM configuration environment [default]: default
Looking for resources needed for deployment.Found!
  Managed S3 bucket: aws-sam-cli-managed-default-samclisourcebucket-1234  A different default S3 bucket can be set in samconfig.toml
Saved arguments to config fileRunning 'sam deploy' for future deployments will use the parameters saved above.The above parameters can be changed by modifying samconfig.tomlLearn more about samconfig.toml syntax athttps://docs.aws.amazon.com/serverless-application-model/latest/developerguide/serverless-sam-cli-config.html
Deploying with following values:
Stack name                   : ajcwebdev-samRegion                       : us-west-1Confirm changeset            : FalseDeployment s3 bucket         : aws-sam-cli-managed-default-samclisourcebucket-1234Capabilities                 : ["CAPABILITY_IAM"]Parameter overrides          : {}Signing Profiles             : {}
CloudFormation outputs from deployed stack:
Key                 HelloWorldFunctionIamRoleDescription         Implicit IAM Role created for Hello World functionValue               arn:aws:iam::1234:role/ajcwebdev-sam-HelloWorldFunctionRole-1234
Key                 HelloWorldApiDescription         API Gateway endpoint URL for Prod stage for Hello World functionValue               https://y4mpitesn5.execute-api.us-west-1.amazonaws.com/Prod/hello/
Key                 HelloWorldFunctionDescription         Hello World Lambda Function ARNValue               arn:aws:lambda:us-west-1:1234:function:ajcwebdev-sam-HelloWorldFunction-1234
Successfully created/updated stack - ajcwebdev-sam in us-west-1
Copy the URL contained in the Value for HelloWorldApi and send a request with your API tool of choice such as cURL, Postman, or Insomnia.
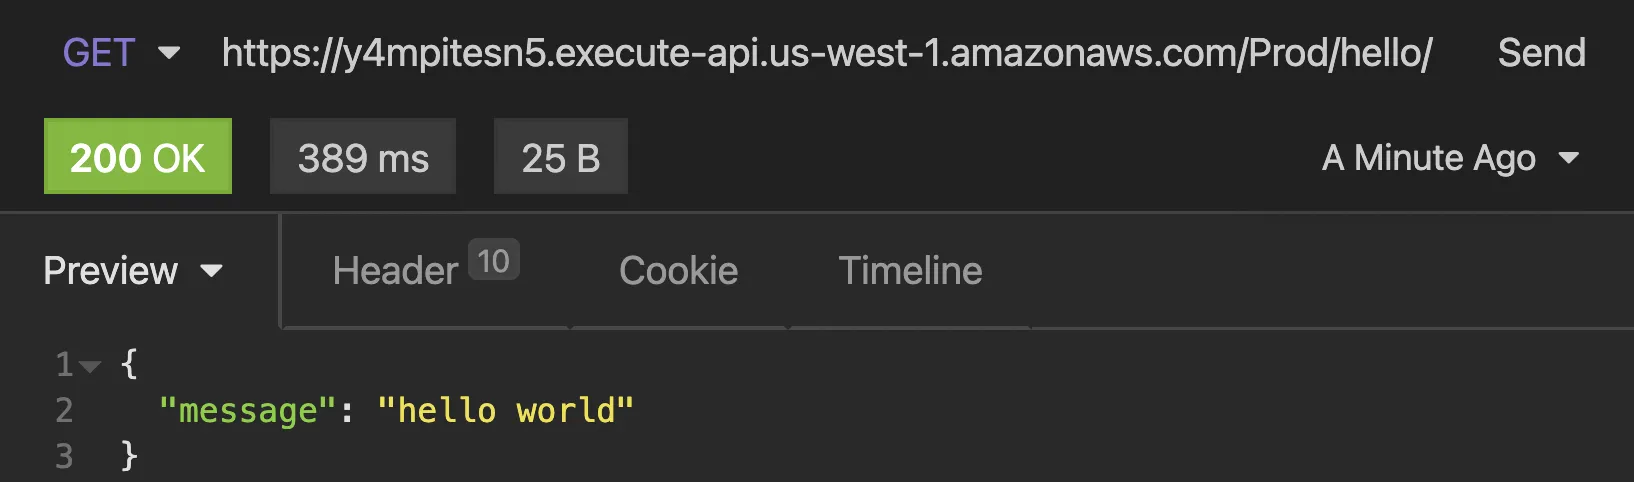
You can also just use a good ol’ fashion web browser.

Delete Stack
Since this is a simple hello world application with an unsecured API endpoint, you should consider tearing the project down unless you intend on adding addition security features. To delete the sample application that you created:
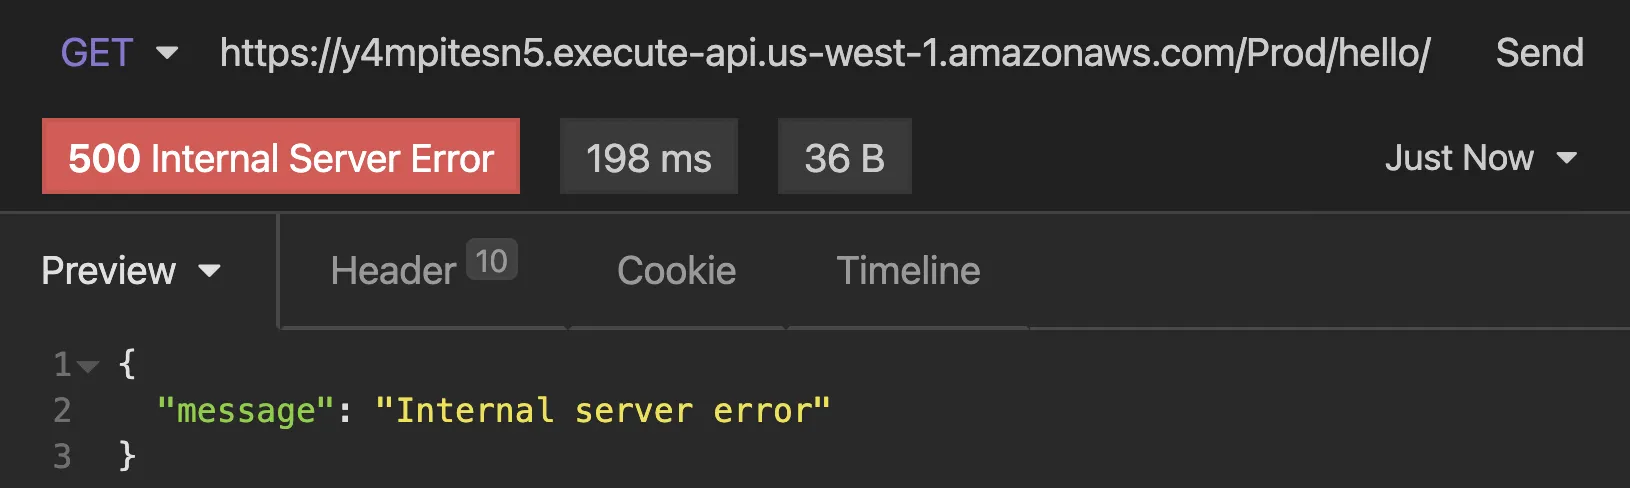
aws cloudformation delete-stack --stack-name ajcwebdev-samIf you send another request to the endpoint you will receive a 500 error message.